In this post I’ll describe the process of configuring monitoring of EqualLogic storage using System Center Operations Manager 2012 (SCOM).
Firstly, download the EqualLogic management pack suite from the EqualLogic download centre. Import the management pack into SCOM according to the instructions in the user guide.
Log into the EqualLogic group configuration. Click on Group Configuration, then the SNMP tab and if necessary, create a read only SNMP community. In the screenshot below I have the SANHQ-RO community already created as I use EqualLogic SAN Head Quarters.
In the SCOM management console, open the Administration tab and click on Discovery Wizard.
When the wizard starts, click on Network devices.
In the following screen enter a name for the group you’re going to monitor, select your management server and resource pool and click Next.
On the Discovery Method screen choose Explicit discovery.
On the Default Account screen click on Create Account to create the SNMP Run As account. Enter a display name and click Next
Enter the read only community string from EqualLogic group configuration and click Create.
Click Next to continue the discovery wizard.
On the Devices screen click Add. On the following screen enter the EqualLogic Group IP address, change the access mode the SNMP and select the Run As account you just created.
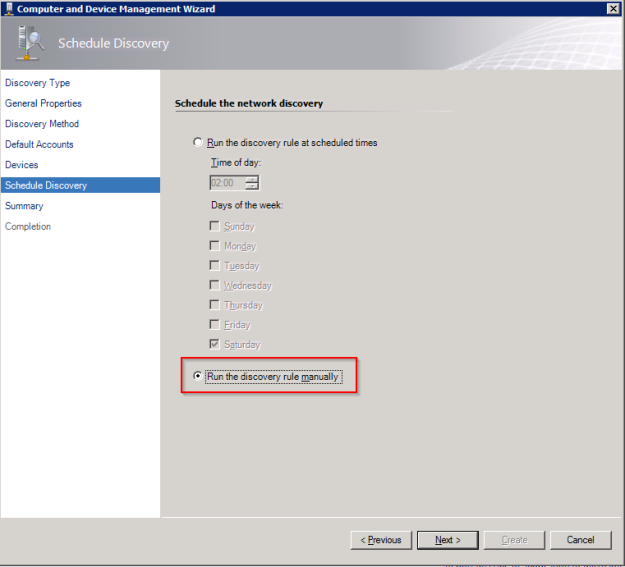
Click Next to schedule discovery. As this is a one-off discovery, choose Run the discovery rule manually.
Click Next and Create to complete the wizard. Choose to run the discovery rule when the wizard closes.
After a few minutes you should see an entry under Network Devices with the IP address of your EqualLogic group.
If you navigate to the Monitoring pane and expand Dell -> State Views -> EqualLogic Devices you should see your EqualLogic group listed.


