Monthly Archives: July 2013

User License Enforcement In SharePoint 2013

One of the great features of SharePoint 2013 is User License Enforcement.  This enables you to map users, or Active Directory security groups to a SharePoint license level.

User License Enforcement is disabled by default and is dependent on Claims authentication.  However, Claims authentication is the default in SharePoint 2013 http://technet.microsoft.com/en-us/library/cc262350.aspx.

To enable User License Enforcement, open the SharePoint 2013 Management Shell and type Enable-SPUserLicensing.  To confirm User Licensing is enabled type Get-SPUserLicensing.  Enabled, True should be the output if it’s enabled.

To map an Active Directory security group to a SharePoint Enterprise license enter

$a = New-SPUserLicenseMapping -SecurityGroup “yoursecuritygroup” -License Enterprise

Add-SPUserLicenseMapping $a

Replace Enterprise with either “Standard”, “Project”, “DUET”, or “WAC” depending on the license level you wish to enable.  Project is for Office Project Server, DUET is for SAP and WAC is for edit rights in Office Web Apps.

In the screenshot below I’ve mapped two Active Directory security groups to different license levels, one to an Enterprise license and one to a Standard license.

UserLicensing1

Once you have configured the license mapping, enter Get-SPUserLicenseMapping to view the mappings.

UserLicensing2

Once the User License Enforcement has been configured users will see a different view dependent on their license level.  Below you can see a user mapped to an Enterprise license can create sites, such as Business Intelligence Center.

UserLicensing3

The user in the screenshot below is mapped to a Standard license and has a different set of site creation options.

UserLicensing4

If a user with a Standard license accesses a page containing an Enterprise level web part they may see an error relating to a lack of license.

UserLicensing5

For a full list of licensing PowerShell cmdlets visit the TechNet site http://technet.microsoft.com/en-us/library/jj219609.aspx

An Unhandled Exception Has Occurred When Creating A Business Intelligence Center

You attempt to create a Business Intelligence Center site and receive and error like the one below.

BIError1


You may also see an error in the application event log for ASP.NET 4.0, event id 1309.

Exception information:
Exception type: SPException
Exception message: Dependency feature ‘PPSSiteCollectionMaster’ (id: a1cb5b7f-e5e9-421b-915f-bf519b0760ef) for feature ‘PPSSiteMaster’ (id: 0b07a7f4-8bb8-4ec0-a31b-115732b9584d) is not activated at this scope.
at Microsoft.SharePoint.SPGlobal.HandleComException(COMException comEx)
at Microsoft.SharePoint.Library.SPRequest.ApplyWebTemplate(String bstrUrl, String bstrWebTemplateContent, Int32 fWebTemplateContentFromSubweb, Int32 fDeleteGlobalListsWithWebTemplateContent, String& bstrWebTemplate, Int32& plWebTemplateId)
at Microsoft.SharePoint.SPWeb.ProvisionWebTemplate(SPWebTemplate webTemplate, String webTemplateToUse, SPFeatureWebTemplate featureWebTemplate)
at Microsoft.SharePoint.SPWeb.ApplyWebTemplate(SPWebTemplate webTemplate)
at Microsoft.SharePoint.ApplicationPages.TemplatePickerUtil.ApplyWebTemplateAndRedirect(SPWeb Web, String strWebTemplate, Nullable`1 bSharedNav, Boolean bOnTopNav, Boolean bOnQuickLaunch, Page page, Boolean bDeleteOnError)
at Microsoft.SharePoint.ApplicationPages.NewSubwebPage.BtnCreateSubweb_Click(Object sender, EventArgs e)
at System.Web.UI.WebControls.Button.RaisePostBackEvent(String eventArgument)
at System.Web.UI.Page.ProcessRequestMain(Boolean includeStagesBeforeAsyncPoint, Boolean includeStagesAfterAsyncPoint)

These errors are caused because the PerformancePoint Services Site Collection feature hasn’t been enabled at the Site Collection level.  Open Site Settings, then click on Site collection features under Site Collection Administration.

BIError2


Activate the PerformancePoint Services Site Collection Feature.

BIError3


User Context Sensitive Searching In SharePoint 2013 Part 2

This is the second post in a two part series.  The purpose of this two part series is to demonstrate how you can alter SharePoint 2013 search results based upon the current user.  The example I’ll use here is promoting specific search results to the top of the search result list based on the user’s department in Active Directory.  This feature is known as User Segmentation and the method I describe is my take on the information and code available here http://blogs.technet.com/b/speschka/archive/2012/12/02/using-user-context-aka-as-segmentation-in-search-with-sharepoint-2013.aspx and here http://msdn.microsoft.com/en-us/library/jj870831.aspx

In this post I’ll show the user properties within SharePoint 2013 for two test users.  Each user has a different department and will see the search results ordered differently.

UCSS1 UCSS2

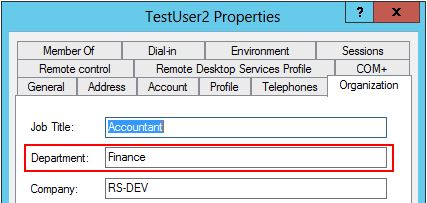
Once the users have been imported from Active Directory, the properties are displayed in the User Profile Service Application.

UCSS3 UCSS4

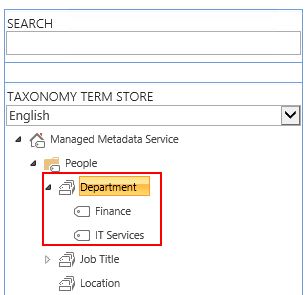
During the user import process a taxonomy is automatically created to hold the department values.  This is where the web part looks up the user’s department and retrieves the term tag ID.  You can see a term has been created for each department.  You can open the Managed Metadata Service from Site Settings, or from the Service Application.

UCSS5

Add the custom web part to a SharePoint web part page.  The link to download the Visual Studio solution and installation instructions are in the previous post.

UCSS6

Edit the web part properties and click on Change query.  On the basics tab select your search source and enter your search term.  Click Test to run the query, results will appear in the right-hand pane.  Click OK to save changes.UCSS7

On the web part properties ensure that result table is set to RelevantResults.  Save you changes to the page.

UCSS8

At this point the web part is returning same results as the standard Content Search Web Part.  The next step is to create query rules to alter the search results based on the user’s department.

Navigate to your Search Service Application and open Query Rules.

UCSS10

Select Local SharePoint Results and click New Query Rule.  This will create a query rule that will fire for any search of local SharePoint content.

UCSS11

Enter a rule name, expand Context, then under “Query is performed by these user segments” select “One of these user segments” and click Add User Segment.  Here we will select the department for which we want the rule to fire.

UCSS12Enter a title for the segment, e.g. IT Services and click add user segment term.  Expand the Managed Metadata Service, then navigate to the Department taxonomy and select the desired department, click Save.

UCSS13The query rule should now look as follows.

UCSS14Under Query Conditions click Remove Condition as we want the query rule to fire for any search term.

UCSS15In the Actions section click Change ranked results by changing the query.  Here we will promote results with a certain keyword in their title.

UCSS16In order to experiment with the query rule you need to have enabled the Search Server Web Parts and Templates feature under Site Settings, Site Collection Features in the Central Administration web site.  If this feature hasn’t already been enabled, you will receive an error when testing the query.  If this happens, cancel the Build Your Query wizard, enable the feature and return here to continue the process.

When the Build Your Query wizard loads enter a search term in the Query text box and click Test query.  The results in the search result preview pane show the search results before we begin to alter the ranking.

UCSS17Next, click onto the Sorting tab.  Click Set top sorting level to rank, then click Add dynamic ordering rule.

UCSS18In this example I’m going to promote search results with the word “health” in the title to the top of the search results.

UCSS19Click onto the Test tab to preview the changes the dynamic ordering rule has made to the search result ranking.  You can see the result with “health” in the title has been promoted to the top of the search results.

UCSS20Remove your test query term from the Basics tab, click Ok, followed by Save to save your query rule.  For this example I repeated the process to create a second rule.  This rule fires for users in the Finance department and promotes results with the keyword “tax” to the top of the search results.

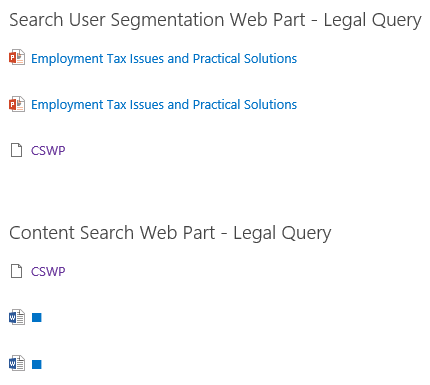
Below are three screenshots.  Each screenshot shows the same SharePoint page with the customised web part at the top and a standard Content Search Web Part at the bottom viewed as a different user.  You can see that the query rule using user segmentation only works on the custom web part.  The first screenshot is for a user that’s not in IT Services, or Finance and you can see the search results for both web parts are the same.  The second screenshot is for a user in IT Services and you can see the results with “health” in the title have been promoted.  The final screenshot is for a user in the Finance department and you can see the results with “tax” in the title have been promoted.

UCSS21UCSS22

UCSS23

The process I have described in this two part series is just an example.  You can adapt the web part and query rules to meet you own requirements.  Query rules are extremely powerful, yet easy to use.  I hope this two part series has give you some ideas you can implement in your environment.

User Context Sensitive Searching In SharePoint 2013 Part 1

The purpose of this two part series is to demonstrate how you can alter SharePoint 2013 search results based upon the current user.  The example I’ll use here is promoting specific search results to the top of the search result list based on the user’s department in Active Directory.  This feature is known as User Segmentation and the method I describe is my take on the information and code available here http://blogs.technet.com/b/speschka/archive/2012/12/02/using-user-context-aka-as-segmentation-in-search-with-sharepoint-2013.aspx and here http://msdn.microsoft.com/en-us/library/jj870831.aspx

In order for this to work you need SharePoint 2013 Enterprise, as the code makes use of the Content Search Web Part (CSWP), which is only available in SharePoint 2013 Enterprise.  You need to have an instance of the User Profile Service Application working with users imported from Active Directory and the department field populated.  You also need to have configured the Managed Metadata Service Service Application as we make use of the people taxonomy.  You’ll also need Visual Studio 2012 with the Office Developer Tools for Visual Studio 2012 (http://aka.ms/OfficeDevToolsForVS2012) to edit the web part.

An overview of the method I’ll cover in the two posts is as follows:

Create a web part which is an extension of the CSWP.  The web part retrieves the current user’s department from the User Profile Service Application within SharePoint.  Next the web part looks up the term ID of the user’s department within the People taxonomy in the Managed Metadata Service.  The department tag ID is added to the User Segment terms.

A query rule is created within the Search Service Application which fires for a specific department in the User Segment terms.  The query rule is used to alter the search result ranking.

The Visual Studio solution is available to download here https://1drv.ms/u/s!AnQuhI0KfyfurTYC0BlSPffu1r_I You can open the solution in Visual Studio and deploy it, or just deploy the wsp file from Search User Segmentation\Search User Segmentation\bin\Debug folder within the zip file using PowerShell, or STSADM.

My Sites Site Collection Has NoCrawl Flag Set

Following the creation of a My Sites site collection I attempted to search for a user, but no results were returned.  I checked the search service crawl log and saw that the crawl of the My Sites site collection had failed due to “The item and all items under it will not be crawled because the owner has set the NoCrawl flag to prevent it from being searchable”.

MySitesNoCrawl

In order to remove the NoCrawl flag, open the offending site as a site administrator.  Click on the URL in the error to open the site.  Open Site settings and navigate to the Search section.  Click on Search and offline availability.

MySitesNoCrawl2

Change Allow this site to appear in search results to Yes and save your changes.  Now re-crawl the site.

MySitesNoCrawl3

Incorrect Permissions For Central Administration Following Initial SharePoint 2013 Installation

Following the installation of a SharePoint 2013 environment I had an issue where Farm Administration security settings hadn’t been correctly applied.  Even though my SharePoint setup user account was listed in the Farm Administrators group and was a local administrator, many options were missing from the Central Administration site.  Some of the missing options included manage services on server and I was unable to create new service applications.

In order to correct the permissions, I re-ran the SharePoint 2013 Products Configuration Wizard.  When running the wizard I left all the options as they were.  Once the wizard had completed the permissions had been set correctly and Central Administration displayed all the options correctly.

Open A SharePoint Document Library In Windows Explorer On A Server

If you attempt to open a SharePoint document library in Windows Explorer on a server, you’ll probably be greeted with the message “We’re having a problem opening this location in File Explorer.  Add this web site to your Trusted Sites list and try again.”

LibraryInWindowsExplorer


In order to view the library in Windows Explorer you need to enable the Desktop Experience feature on the server.  On Windows Server 2012 open Server Manager, then click on Add roles and features.

EnableDesktopExperience0


In features, expand User Interfaces and Infrastructure and tick Desktop Experience.  Complete the wizard and reboot to enable the feature.


EnableDesktopExperience1

SharePoint Email Alert URLs Are Incorrect After A Database Attach Upgrade

If you upgrade from a previous version of SharePoint using the database attach method and the web application URL changes, the URL used in SharePoint email alerts is not updated.  This can also happen when the web application URL changes for other reasons.

To fix the problem run the PowerShell script here http://technet.microsoft.com/en-us/library/cc508847(v=office.14).aspx