Monthly Archives: August 2013

Customising A SharePoint Display Form To Remove A Field

Clicking View Properties on a SharePoint list item loads a display form which shows all the list columns and their values.  I needed to remove one of the list columns from a display form and in this post I’ll show you how I did it.  I’m going to remove the specific image column in the screenshot below.
HideField1

In SharePoint Designer open the list you want to customise.  In the Forms section click New.

HideField2

Provide a file name and select the form type you want to create.  Here I’m creating a display item form.  I’ve chosen to set the new form as the default display form as I want to override the default form.

HideField3

In the Forms section right-click on the form and select Edit File in Advanced Mode.
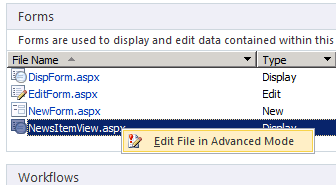
HideField4

Switch to code view and select the HTML for the row you want to remove. Each row is displayed withing <tr></tr> table row tags.  In the screenshot below I’ve selected the row which displays the jurisdiction column.  Once you’ve selected the correct row click delete.

HideField5

Save your changes.  When you click on the list item and select view properties you’ll see that the row has been removed.

HideField6

If your list contains attachments please be aware of the following bug whereby attachments aren’t displayed in the custom display form.  See the KB article for more information and a workaround.

“SharePoint Designer created display forms do not display attachments when present.”
http://support.microsoft.com/kb/2590041

System Center Virtual Machine Manager 2012 SP1 Permission Issues

I recently had to troubleshoot an issue on a System Center Virtual Machine Manager 2012 (SCVMM) SP1 server.

All the managed hosts were in a state of “Needs Attention”.  When viewing the status screen for the host, the WinRM status was critical.  Pressing refresh in the host status screen resulted in the error message:

VMM does not have appropriate permissions to access the resource  on the %SCVMMSERVER% server.

Also, verify that CredSSP authentication is currently enabled on the service configuration of the target computer %HOSTSERVER%. To enable the CredSSP on the service configuration of the target computer, run the following command from an elevated command line: winrm set winrm/config/service/auth @{CredSSP=”true”}

The event log also contained the error:

The Virtual Machine Manager management server could not copy a required Hyper-V authorization file to %HOSTSERVER%.

After trying many things without success, I attempted a re-install of SCVMM.  This also failed with the message:

VMM does not have appropriate permissions to access the resource  on the %SCVMMSERVER% server.

The SetupWizard.log contained the message:

VMMPostinstallProcessor threw an exception: Threw Exception.Type: Microsoft.Carmine.WSManWrappers.WSManProviderException, Exception.Message: VMM does not have appropriate permissions to access the resource  on the %SCVMMSERVER%

The problem turned out to be caused by the proxy configuration on the SCVMM server.  In order to reset the proxy configuration I opened an elevated command prompt and ran “netsh winhttp reset proxy”. I was then able to re-install SCVMM successfully.

Enable Refiner Counts In SharePoint 2013 Search

By default, search refiners in SharePoint 2013 don’t show a result count.  However, it’s easy to enable them with one change to the filter display template.  Below is how a refiner appears by default

RefinerCounts1

The easiest way to work with display templates is to map a drive to \\%SHAREPOINTSERVER%@80\_catalogs\masterpage\.  Expand the folder tree and navigate to the Filters folder.  Backup a copy of Filter_Default.html before making changes.

RefinerCounts0

Open Filter_Default.html in a text editor, I like to use Notepad++.  Navigate to the section as shown below and change the “ShowCounts:” value from false to true.  Save your changes.

RefinerCounts2

Refresh the search page and refiner counts are now visible.

RefinerCounts3

5


Tweaking The Blank Web Part Page Template In SharePoint 2013

The Blank Web Part Page template in SharePoint 2013 has a large Page Content section.  I find this irritating as you have to scroll down to get to the web part section.  In this post I’ll show how you can reduce the size of this section to make editing pages easier.

Blank Web Part Page Layout1

Open SharePoint Designer and navigate to the Page Layouts section.  Check Out the BlankWebPartPage.aspx file.

BlankWebPartPageLayout2

Open the file and Advanced Mode.  Scroll down to the line starting <PublishingWebControls:RichHtmlField FieldName=”PublishingPageContent”.  Find the property MinimumEditHeight and change the value to something like 50px.

BlankWebPartPageLayout3

Check In BlankWebPartPage.aspx and Publish a major version.

BlankWebPartPageLayout4

When you create a page using this template you’ll see the Page Content section is smaller.

BlankWebPartPageLayout5

6