Monthly Archives: March 2013

SharePoint People Picker – There was an error in the callback

When trying to configure the people picker to search a trusted domain I ran the command “STSADM.exe -o setproperty -pn peoplepicker-searchadforests -url http://servername” using the SharePoint 2010 Management Shell from the Central Administration server in our SharePoint farm.  I received the error:

“The Web application at http://servername could not be found.  Verfiy that you have typed the URL correctly.  If the URL should be serving existing content, the system administrator may need to add a new request URL mapping to the intended application.”

The error was strange because the web application URL I entered does exist.  I removed the URL parameter and ran the command again.  This time it ran without error.  To check the value I ran the command “STSADM.exe -o getproperty -pn peoplepicker-searchadforests”  This returned the value I expected.  However, when I tried to search for users from the remote domain nothing was returned.

I then connected to one of the Web Front End servers and ran “STSADM.exe -o getproperty -pn peoplepicker-searchadforests”.  Again, it returned the expected value.  I then ran the command with the URL parameter “STSADM.exe -o getproperty -pn peoplepicker-searchadforests -URL http://servername”  This didn’t return the expected value.

I realized that the initial command  “STSADM.exe -o setproperty -pn peoplepicker-searchadforests -url http://servername” needed to be run from the web front end server.  This time I didn’t receive the error about the web application not being found.

Unfortunately, this isn’t the end of the story as when I searched for a user I received the error “There was an error in the callback”.

People Picker


In order to fix this error I had to update the permissions on the registry key “HKEY_LOCAL_MACHINE\SOFTWARE\Microsoft\Shared Tools\Web Server Extensions\14.0\Secure” on each Web Front End server.  The local groups need the following  permssions:

WSS_WPG – Read

WSS_ADMIN_WPF – Full

WSS_RESTRICTED_WPG_V4 – Full

Having changed the permissions I was able to search.

SQL Server Reporting Services Service Fails To Start After Windows Updates

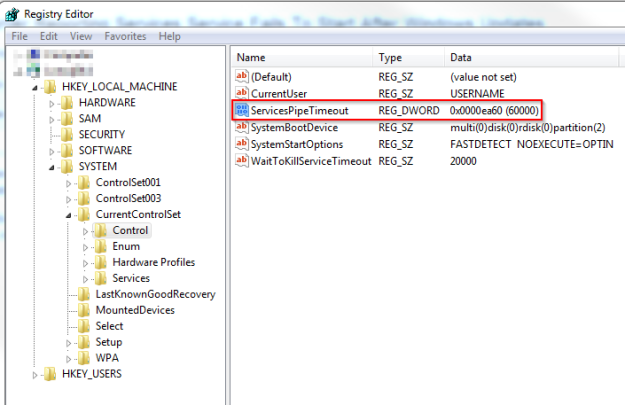
Following an update of a SQL 2005 SSRS server to SP4 + all Windows Updates, the SSRS service would not start.  “Report Server (MSSQLSERVER) cannot connect to the report server database.” was logged in the Application Event Log.  “Timeout (30000 milliseconds) waiting for the SQL Server Reporting Services (MSSQLSERVER) service to connect.” was logged in the System Event Log.

The resolution was to update the HKEY_LOCAL_MACHINE\SYSTEM\CurrentControlSet\Control\ServicesPipeTimeout registry key to 60000.  This increases the time allowed for a service to start from 30 seconds, to 60 seconds.  In my case the registry key didn’t exist so I had to create it.  Once the registry has been updated/created reboot the server.

SSRS

Add Fly-out Menus To The SharePoint Top Link Bar

The top link bar is the set of links that provides navigation to sites within your site hierarchy.  By default. only the first level of sub-sites is displayed.  This is represented in the screenshot below by sites Test2, Test4 and Test5.

SPMenu0

I had a requirement to add a fly-out menu to display sub-sites.  This is easily achieved using SharePoint Designer to edit the master page for your site.  The top link menu is rendered by an AspMenu control within the master page and this can be configured to display multiple levels.

SPMenu1

To edit the master page, open SharePoint Designer, navigate to your master page, right-click and choose Edit File In Advanced Mode.  Choose to check out the file when prompted.

SPMenu2

Find the AspMenu control with the ID

  • TopNavigationMenuV4.  The easiest way to do this is using CTRL+F.  Change the

  • MaximumDynamicDisplayLevels value to 2.

SPMenu3

Right-click on your master page and choose Check In.  When prompted, choose to publish a major version.  If necessary, approve the updated master page.

SPMenu4

You can turn on and off the display of sub-sites from Site Settings for each site.  In the example below, in order to display the fly out for Test3 I opened site Test2, then went to Site Actions -> Site Settings, then Navigation under Look and Feel.  Tick the box to Show subsites and click ok.

SPMenu5

SPMenu1

Not all terms were imported successfully. Please see the server log for more information – SharePoint Managed Metadata

I was sent a SharePoint taxonomy that had been edited in Microsoft Excel.  When I attempted to import the taxonomy I received the error “Not all terms were imported successfully. Please see the server log for more information”

SPMMD1

When I looked at the csv file in Excel I couldn’t see anything wrong with it.  However, when I opened the file in Notepad++ http://notepad-plus-plus.org/ the cause of the problem was obvious.  If you look at the screenshot below you can see that editing the taxonomy in Excel has added extra rows to the csv file which are invalid.

SPMMD2

I used Notepad++ to delete the extra rows, see below.  The taxonomy then imported without error.

SPMMD3

Adobe Reader Patching Using System Center Configuration Manager 2007 R2

In this post, I’ll go through the process to update Adobe Reader using System Center Configuration Manager 2007 R2 (SCCM) and a simple batch file.

The formula for patching Adobe Reader is last MSI + last quarterly patch + latest out of cycle patch, see for more information http://helpx.adobe.com/acrobat/kb/update-patch-acrobat-reader-10.html

In this example I’ll update Adobe Reader 10.1.3 to the last quarterly patch, 10.1.5, followed by the latest out of cycle patch 10.1.6.  Download the required files from the link above and copy them to a share where all users have read access.

Create a batch file in the share called Patch.cmd.  Edit the batch file and enter the text below, replacing SHARE with the path to your share with the installation files.

\\SHARE\AdbeRdrUpd1015.msp /qn
\\SHARE\AdbeRdrSecUpd1016.msp /qn

Now setup a standard software package in SCCM to run the batch file.  On the program properties, choose to run Hidden and take no action after running.  From the Environment tab ensure the program can run Whether or not a user is logged on and Run with administrative rights.  I also Suppress program notifications on the Advanced tab.

AdobeReader1 AdobeReader2 AdobeReader3

In order to update Adobe Reader when a new version is released, download the latest quarterly patch and any out of cycle patch.  Copy them to the installation share and update Patch.cmd to run the latest updates according to the formula last MSI + last quarterly patch + latest out of cycle patch.

I then enable the advertisement to re-run every time and re-run the advertisement to deploy the latest update.  To do this, right-click on the advertisement and choose properties, go to the schedule tab, change Program rerun behavior to “Always rerun program”.  Click Ok, then right-click on the advertisement and choose Re-run Advertisement.

AdobeReader4