Category Archives: System Center Configuration Manger

Office 365 ProPlus installation detection with System Center Configuration Manager (SCCM)

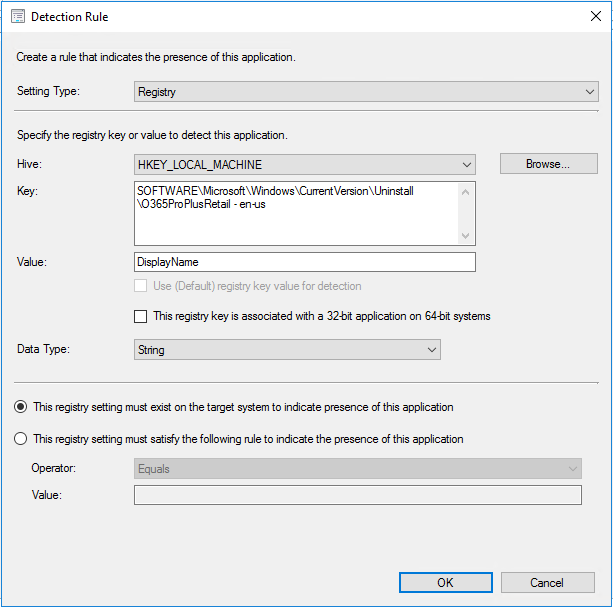
Microsoft have a good guide showing how to deploy Office 365 ProPlus with System Center Configuration Manager (SCCM), see here.  Within the guide there’s a section  showing the detection rule to use.  However, I’ve found the registry detection method doesn’t work and Office 365 ProPlus will install, but Software Centre will show the installation as failed.

The Microsoft guide has the following configuration, which I’ve found to not work.

O365PP0

This is the detection method I use.  If you update the detection method, run a machine policy retrieval & evaluation cycle on an affected machine to test the change.

O365PP1

WSUS Integrated With SCCM 2012 R2 Fails To Start

On SCCM 2012 R2 with WSUS integrated for software update deployments I was unable to open the WSUS console.  The WSUS service had stopped and the event log showed event ID 507 Windows Server Update Services, Update Services failed its initialization and stopped.  WSUS is configured to use a SQL database and the SQL Server Logs contained multiple errors for Login failed for user ‘DOMAIN\SCCMSERVERNAME$’. Reason: Could not find a login matching the name provided. [CLIENT: <local machine>]

Opening SQL Server Management Studio, I navigated to the SUSDB.  Expanding users showed a user for NT AUTHORITY\NETWORK SERVICE.

SCCMWSUS1

I next opened Security -> Logins and could not see a login for NT AUTHORITY\NETWORK SERVICE.  I added a login for NT AUTHORITY\NETWORK SERVICE and started the WSUS service.  this resolved the problem.

SCCMWSUS2windowwindows


Create A Dedicated Account To Join Computers To A Domain

This is a quick post to describe the process of creating a dedicated account for joining machines to an Active Directory (AD) domain.  This is useful for things like System Center Configuration Manger task sequences and System Center Virtual Machine Manager templates.

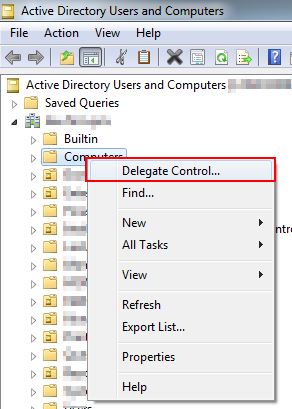
First create a standard Windows user account.  Next, right-click on the Computers Organisation Unit (OU) within your AD domain.  From the menu choose Delegate Control…

DJA1


On the next screen (Users or Groups) choose Add and select the user account you just created.  Click Next.  Choose “Create a custom task to delegate” on the next screen.

DJA2


Next, choose to only delegate control to computer objects and tick Create and Delete selected objects in this folder.  Click Next.

DJA3


On the next screen choose to show general permissions and from the list select:

  • Reset password
  • Read and write account restrictions
  • Validated write to DNS host name
  • Validated write to service principal name

DJA4

Click Next and finish to complete the wizard.  Repeat this process for any other OUs where you’ll be joining computers to the domain.

Adobe Reader Patching Using System Center Configuration Manager 2007 R2

In this post, I’ll go through the process to update Adobe Reader using System Center Configuration Manager 2007 R2 (SCCM) and a simple batch file.

The formula for patching Adobe Reader is last MSI + last quarterly patch + latest out of cycle patch, see for more information http://helpx.adobe.com/acrobat/kb/update-patch-acrobat-reader-10.html

In this example I’ll update Adobe Reader 10.1.3 to the last quarterly patch, 10.1.5, followed by the latest out of cycle patch 10.1.6.  Download the required files from the link above and copy them to a share where all users have read access.

Create a batch file in the share called Patch.cmd.  Edit the batch file and enter the text below, replacing SHARE with the path to your share with the installation files.

\\SHARE\AdbeRdrUpd1015.msp /qn
\\SHARE\AdbeRdrSecUpd1016.msp /qn

Now setup a standard software package in SCCM to run the batch file.  On the program properties, choose to run Hidden and take no action after running.  From the Environment tab ensure the program can run Whether or not a user is logged on and Run with administrative rights.  I also Suppress program notifications on the Advanced tab.

AdobeReader1 AdobeReader2 AdobeReader3

In order to update Adobe Reader when a new version is released, download the latest quarterly patch and any out of cycle patch.  Copy them to the installation share and update Patch.cmd to run the latest updates according to the formula last MSI + last quarterly patch + latest out of cycle patch.

I then enable the advertisement to re-run every time and re-run the advertisement to deploy the latest update.  To do this, right-click on the advertisement and choose properties, go to the schedule tab, change Program rerun behavior to “Always rerun program”.  Click Ok, then right-click on the advertisement and choose Re-run Advertisement.

AdobeReader4

Adobe Flash Deployment and Patching Using System Center Configuration Manager 2007 R2

In this post, I’ll go through the process to deploy and update Adobe Flash using System Center Configuration Manager 2007 R2 (SCCM) and a simple batch file.

If you don’t have a license to distribute Adobe Flash, apply for one here http://www.adobe.com/products/players/flash-player-distribution.html.  It’s a simple process and gives you access to the offline msi installations of Adobe Flash.

Once you have your software distribution license for Adobe Flash, download the msi installer for the latest version of Flash and store it on a share.  Ensure all users have read access to this share as the installation will run from here.

In the same share create a batch file.  In this example I’ve called the batch file InstallAdobeFlash.cmd.  Create another text file in the same location called mms.cfg.  This file will be used to disable automatic Adobe Flash updates.  Your share should look something like this.

Flash1

Edit mms.cfg and add the following two lines to disable auto updates:

AutoUpdateDisable=1
SilentAutoUpdateEnable=0

The Adobe Flash msi updates any existing installations, so the deployment and update process is simple.  Edit InstallAdobeFlash.cmd and add the lines below, updating the share path for your environment.  The batch file silently updates Adobe Flash to the latest version and copies the mms.cfg file to the appropriate location depending upon whether the computer is 32, or 64 bit.

If Not Exist %WINDIR%\SysWow64\Macromed\Flash GoTo 32Bit

:64Bit
msiexec /i \\ServerShare\SoftwareDistribution\Packages\Adobe_Flash\install_flash_player_11_active_x.msi /qn
copy \\ServerShare\SoftwareDistribution\Packages\Adobe_Flash\mms.cfg %WINDIR%\SysWow64\Macromed\Flash /y

:32Bit
msiexec /i \\ServerShare\SoftwareDistribution\Packages\Adobe_Flash\install_flash_player_11_active_x.msi /qn
copy \\ServerShare\SoftwareDistribution\Packages\Adobe_Flash\mms.cfg %WINDIR%\System32\Macromed\Flash /y

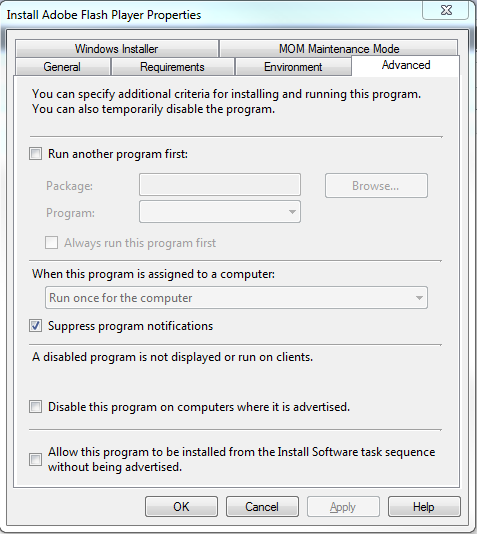
Now setup a standard software package in SCCM to run the batch file.  On the program properties, choose to run Hidden and take no action after running.  From the Environment tab ensure the program can run Whether or not a user is logged on and Run with administrative rights.  I also Suppress program notifications on the Advanced tab.

Flash2 Flash3 Flash4

In order to update Adobe Flash when a new version is released, download the latest msi.  Copy it to the installation share, overwriting the previous version’s msi.  I then enable the advertisement to re-run every time and re-run the advertisement to deploy the latest update.  To do this, right-click on the advertisement and choose properties, go to the schedule tab, change Program rerun behavior to “Always rerun program”.  Click Ok, then right-click on the advertisement and choose Re-run Advertisement.

Flash5

Enterprise Java Deployment and Patching Using System Center Configuration Manager 2007 R2

In the steps below, I’ll guide you through the process of deploying and patching Java using System Center Configuration Manager 2007 R2 (SCCM).  Deployment and patching will be achieved using a single batch file.

Download the offline installation of Java from http://www.java.com/en/download/manual.jsp and copy to a network share where all users have read access.  This is where the installation will run from.

Create a batch file on the share in the same location, in this example I’ve called it Update_Java.cmd

Java1

If you have Java installed on your PC, when you install a newer version, the old versions aren’t removed.  This means you’re still vulnerable to any security issues in the old versions.  In order to uninstall the previous versions of Java you’ll need to look up the uninstall string in the registry.  On 32bit Windows this can be found at “HKEY_LOCAL_MACHINE\SOFTWARE\Microsoft\Windows\CurrentVersion\Uninstall\” and on 64bit at “HKEY_LOCAL_MACHINE\SOFTWARE\Wow6432Node\Microsoft\Windows\CurrentVersion\Uninstall\”.  Navigate to the previously mentioned locations and choose Find from the Edit menu in Registry Editor.  Type java, tick keys, values and data and click Find Next.  Press F3, to keep jumping to the next entry until you find an entry that looks like the one below.

Java2

Copy the value for the UninstallString and paste it into the batch file, followed by /qn.  This will ensure the uninstall is silent.  Continue to add all the uninstall strings to the batch file for all versions of Java you need to uninstall.  Once you’ve finished it should look similar to below.

Java3

The next step is to add the install string for the latest version of Java you downloaded at the beginning.  This takes the form “\\ServerShare\jre-7u13-windows-i586.exe /s REBOOT=Suppress JAVAUPDATE=0”  The REBOOT=Suppress switch prevents the PC from rebooting and JAVAUPDATE=0 disables any Java update notifications.  The completed batch file should look something like this.

Java5

Now setup a standard software package in SCCM to run the batch file.  On the program properties, choose to run Hidden and take no action after running.  From the Environment tab ensure the program can run Whether or not a user is logged on and Run with administrative rights.  I also Suppress program notifications on the Advanced tab.

Java4

Java6 Java7

In order to update Java when a new version is released, download the latest version from the link at the beginning of this post.  Copy it to the installation share, edit the batch file and add the uninstall string for the last version you deployed.  Update the install section at the bottom of the batch file to install the Java version you just downloaded.  I then enable the advertisement to re-run every time and re-run the advertisement to deploy the latest update.  To do this, right-click on the advertisement and choose properties, go to the schedule tab, change Program rerun behavior to “Always rerun program”.  Click Ok, then right-click on the advertisement and choose Re-run Advertisement.

Java8

Configure Dell DRAC For OOB In System Center Virtual Machine Manager 2012

System Center Virtual Machine Manager 2012 (SCVMM) has the ability to communicate with the Dell DRAC.  This enables you to do things such as power on, reset, or power off a host server using the DRAC from the SCVMM console.

I’ve successfully configured SCVMM to communicate with the DRAC 5 and iDRAC 6.  On the DRAC 5 I had to enable IPMI, which is the communication protocol used by SCVMM to communicate with the DRAC.  On the DRAC 5 IPMI is enabled by clicking on Remote Access, followed by the Configuration tab and then Network.  At the bottom of the screen is the option to enable IPMI over LAN.  Click Apply Changes to save your changes.  Check that the user account you wish to use has the IPMI LAN privilege by clicking on the Users tab, next to Network.

On the iDRAC 6, IPMI is enabled by clicking on iDRAC Settings, the Network/Security tab, then Network.  At the bottom of the screen is the option to enable IPMI over LAN.  Click Apply Changes to save your changes.  Check that the user account you wish to use has the IPMI LAN privilege by clicking on the Users tab, next to Network.

To configure SCVMM to use the DRAC, open the SCVMM console and navigate to Fabric.  Right-click on the host and choose properties.  Notice that in the screenshot below the Reset and Power Off options are unavailable as the DRAC hasn’t been configured to work with SCVMM.

Click on Hardware and scroll to the Advanced section at the bottom of the properties page.  Tick the box “This physical machine is configured for OOB management with the following settings”.  Enter the IP address of the DRAC into the BMC address box.  Click Browse next to Run As account.  Click Create Run As Account and register the DRAC account you wish to use.  Untick the Validate domain credentials box if you’re using a DRAC user account.  Once you’ve entered the Run As account click OK.

If you click on the host properties, you will now see that the Reset and Power Off options are available for this host.

Rename A Computer Using Dell Service Tag During An System Center Configuration Manager 2007 Task Sequence

As part of a Windows 7 deployment I wanted to automate the naming of computers using the Dell service tag, prefixed with “D” for desktop, “L” for laptop and “O” for other.

You can detect the computer type using WMI and the Win32_SystemEnclosure class

strComputer = “.”
Set objWMIService = GetObject(“winmgmts:” _
    & “{impersonationLevel=impersonate}!\\” & strComputer & “\root\cimv2”)
Set colChassis = objWMIService.ExecQuery _
    (“Select * from Win32_SystemEnclosure”)
‘Determine the computer type
For Each objChassis in colChassis
    For  Each strChassisType in objChassis.ChassisTypes
        Select Case strChassisType
            Case 3,4,5,6,7,13,15,16,17,18,19,20,21,22,23,24
strComputerType = “D”
            Case 8,9,10,11,12,14
strComputerType = “L”
            Case Else
strComputerType = “O”
End Select
    Next
Next
Wscript.Echo strComputerType
Reading the Dell service tag is possible using WMI and the Win32_BIOS class
‘Read the Service Tag from the BIOS
Set colBIOS = objWMIService.ExecQuery _
    (“Select * from Win32_BIOS”)
For Each objBIOS in colBIOS
strComputerSerial = objBIOS.SerialNumber
Next
Wscript.Echo strComputerSerial
Renaming the computer proved to be the difficult part.  You can use WMI and the Win32_ComputerSystem class to rename a computer, but I didn’t have much success using this in the task sequence.  PowerShell and WMIC commands use the same underlying technique and also failed.  I believe the difficulty was caused by the computer being joined to the domain, rather than being a member of a workgroup.  I found a utility called WSNAME http://mystuff.clarke.co.nz/MyStuff/wsname.asp,  which is capable of renaming domain joined computers using the Windows APIs.  Unfortunately, WSNAME is not native 64bit compatible and I needed to deploy Windows 7 64bit using WinPE 64bt.
The final solution to rename the computer consists of a vbs script which detects the computer type and Dell service tag.  The new computer name is passed to WSNAME which renames the computer using a domain account with a hashed password.  Finally, the vbs script reboots the computer.  The trick to make it work is to add the vbs script to the runonce registry key through the SCCM task sequence, followed by a reboot task, which completes the task sequence.  When Windows starts following the reboot task, the vbs script runs and renames the computer.  As the vbs script is run by Windows 7, rather than WinPE, wsname.exe will work as Windows 7 64bit has WOW64 support, whereas WinPE 64bit does not.
The complete vbs script is
strComputer = “.”
Set objWMIService = GetObject(“winmgmts:” _
    & “{impersonationLevel=impersonate}!\\” & strComputer & “\root\cimv2”)
Set colChassis = objWMIService.ExecQuery _
    (“Select * from Win32_SystemEnclosure”)
‘Is the computer a VM?
Set colComSys = objWMIService.ExecQuery _
    (“Select * from Win32_ComputerSystem”)
For Each objComSys in colComSys
If objComSys.Model = “Virtual Machine” Then
bolVM = True
Else
bolVM = False
End If
Next
‘Wscript.Echo bolVM
‘Determine the computer type
For Each objChassis in colChassis
    For  Each strChassisType in objChassis.ChassisTypes
        Select Case strChassisType
            Case 3,4,5,6,7,13,15,16,17,18,19,20,21,22,23,24
strComputerType = “D”
            Case 8,9,10,11,12,14
strComputerType = “L”
            Case Else
strComputerType = “O”
End Select
    Next
Next
‘Wscript.Echo strComputerType
‘Read the Service Tag from the BIOS
Set colBIOS = objWMIService.ExecQuery _
    (“Select * from Win32_BIOS”)
For Each objBIOS in colBIOS
strComputerSerial = objBIOS.SerialNumber
Next
‘Wscript.Echo strComputerSerial
‘Only rename if not a VM
If bolVM = False Then
‘Wscript.Echo “Computer name will be: ” & strComputerType & strComputerSerial
Set objShell = CreateObject(“Wscript.Shell”)
objShell.Run(“SHARE HOLDIGN WSNAME.EXE /n:” & strComputerType & strComputerSerial & ” /rcid /user:DOMAIN\USERNANE /passm:HASHED PASSWORD”)
objShell.Run(“shutdown.exe /r”)
End If
To add the vbs script to the runonce registry add a Command Line step to the task sequence and enter the command as shown in the screenshot below.  Update the command to include the appropriate path to the vbscript.

Forefront Endpoint Protection 2010 Report. Error: Subreport Could Not Be Shown

When running the Antimalware Activity Report, the Malware Activity section of the report failed to run and showed the error “Subreport could not be shown”.

The environment is System Center Configuration Manager (SCCM) 2007 R2, Forefront Endpoint Protection 2010 and SQL Server 2005 SP4.

In order to fix the error I added the -g startup parameter to the SQL Server service.  The -g startup parameter specifies the amount of memory in MB that SQL Server will leave available for memory allocations within the SQL Server process.  I set the option to 384MB.  More information on the startup parameter is available here: http://msdn.microsoft.com/en-us/library/ms190737.aspx

To apply the startup parameter, open SQL Server Configuration Manager under Microsoft SQL Server 2005 -> Configuration Tools  on the start menu.

Right-click on the SQL Server service, choose properties and open the Advanced tab.

Add ;-g384 to the end of the existing startup parameters and restart the SQL Server service.

Enable Windows Server 2008 R2 Features During Installation Using A System Center Configuration Manager Task Sequence

As part of  an operating system deployment task in System Center Configuration Manager 2007 R2 (SCCM), I needed to enable the .NET Framework 3.5.1 Feature on Windows Server 2008 R2.  I thought it would be easy to do this as part of the task sequence, but it proved trickier than I expected.

I added a “Run Command Line” step and entered the command “Dism.exe /online /Enable-Feature /FeatureName:NetFx3 /LogPath:c:\Dism.log”.  On its own this isn’t enough for the feature to be enabled.  you must also tick the “Disable 64-bit file system redirection” in order for the feature to be enabled.