Monthly Archives: February 2013

Adobe Flash Deployment and Patching Using System Center Configuration Manager 2007 R2

In this post, I’ll go through the process to deploy and update Adobe Flash using System Center Configuration Manager 2007 R2 (SCCM) and a simple batch file.

If you don’t have a license to distribute Adobe Flash, apply for one here http://www.adobe.com/products/players/flash-player-distribution.html.  It’s a simple process and gives you access to the offline msi installations of Adobe Flash.

Once you have your software distribution license for Adobe Flash, download the msi installer for the latest version of Flash and store it on a share.  Ensure all users have read access to this share as the installation will run from here.

In the same share create a batch file.  In this example I’ve called the batch file InstallAdobeFlash.cmd.  Create another text file in the same location called mms.cfg.  This file will be used to disable automatic Adobe Flash updates.  Your share should look something like this.

Flash1

Edit mms.cfg and add the following two lines to disable auto updates:

AutoUpdateDisable=1
SilentAutoUpdateEnable=0

The Adobe Flash msi updates any existing installations, so the deployment and update process is simple.  Edit InstallAdobeFlash.cmd and add the lines below, updating the share path for your environment.  The batch file silently updates Adobe Flash to the latest version and copies the mms.cfg file to the appropriate location depending upon whether the computer is 32, or 64 bit.

If Not Exist %WINDIR%\SysWow64\Macromed\Flash GoTo 32Bit

:64Bit
msiexec /i \\ServerShare\SoftwareDistribution\Packages\Adobe_Flash\install_flash_player_11_active_x.msi /qn
copy \\ServerShare\SoftwareDistribution\Packages\Adobe_Flash\mms.cfg %WINDIR%\SysWow64\Macromed\Flash /y

:32Bit
msiexec /i \\ServerShare\SoftwareDistribution\Packages\Adobe_Flash\install_flash_player_11_active_x.msi /qn
copy \\ServerShare\SoftwareDistribution\Packages\Adobe_Flash\mms.cfg %WINDIR%\System32\Macromed\Flash /y

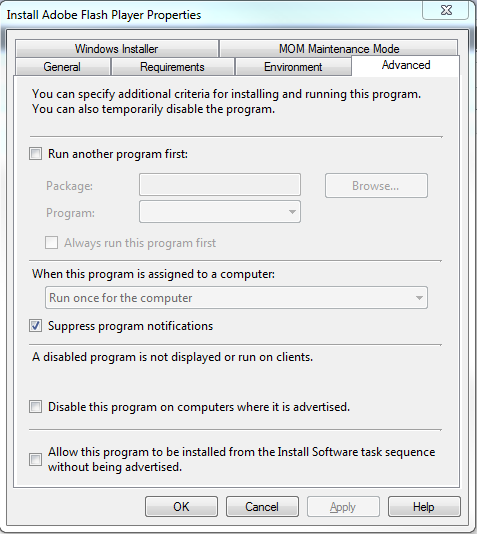
Now setup a standard software package in SCCM to run the batch file.  On the program properties, choose to run Hidden and take no action after running.  From the Environment tab ensure the program can run Whether or not a user is logged on and Run with administrative rights.  I also Suppress program notifications on the Advanced tab.

Flash2 Flash3 Flash4

In order to update Adobe Flash when a new version is released, download the latest msi.  Copy it to the installation share, overwriting the previous version’s msi.  I then enable the advertisement to re-run every time and re-run the advertisement to deploy the latest update.  To do this, right-click on the advertisement and choose properties, go to the schedule tab, change Program rerun behavior to “Always rerun program”.  Click Ok, then right-click on the advertisement and choose Re-run Advertisement.

Flash5

Enterprise Java Deployment and Patching Using System Center Configuration Manager 2007 R2

In the steps below, I’ll guide you through the process of deploying and patching Java using System Center Configuration Manager 2007 R2 (SCCM).  Deployment and patching will be achieved using a single batch file.

Download the offline installation of Java from http://www.java.com/en/download/manual.jsp and copy to a network share where all users have read access.  This is where the installation will run from.

Create a batch file on the share in the same location, in this example I’ve called it Update_Java.cmd

Java1

If you have Java installed on your PC, when you install a newer version, the old versions aren’t removed.  This means you’re still vulnerable to any security issues in the old versions.  In order to uninstall the previous versions of Java you’ll need to look up the uninstall string in the registry.  On 32bit Windows this can be found at “HKEY_LOCAL_MACHINE\SOFTWARE\Microsoft\Windows\CurrentVersion\Uninstall\” and on 64bit at “HKEY_LOCAL_MACHINE\SOFTWARE\Wow6432Node\Microsoft\Windows\CurrentVersion\Uninstall\”.  Navigate to the previously mentioned locations and choose Find from the Edit menu in Registry Editor.  Type java, tick keys, values and data and click Find Next.  Press F3, to keep jumping to the next entry until you find an entry that looks like the one below.

Java2

Copy the value for the UninstallString and paste it into the batch file, followed by /qn.  This will ensure the uninstall is silent.  Continue to add all the uninstall strings to the batch file for all versions of Java you need to uninstall.  Once you’ve finished it should look similar to below.

Java3

The next step is to add the install string for the latest version of Java you downloaded at the beginning.  This takes the form “\\ServerShare\jre-7u13-windows-i586.exe /s REBOOT=Suppress JAVAUPDATE=0”  The REBOOT=Suppress switch prevents the PC from rebooting and JAVAUPDATE=0 disables any Java update notifications.  The completed batch file should look something like this.

Java5

Now setup a standard software package in SCCM to run the batch file.  On the program properties, choose to run Hidden and take no action after running.  From the Environment tab ensure the program can run Whether or not a user is logged on and Run with administrative rights.  I also Suppress program notifications on the Advanced tab.

Java4

Java6 Java7

In order to update Java when a new version is released, download the latest version from the link at the beginning of this post.  Copy it to the installation share, edit the batch file and add the uninstall string for the last version you deployed.  Update the install section at the bottom of the batch file to install the Java version you just downloaded.  I then enable the advertisement to re-run every time and re-run the advertisement to deploy the latest update.  To do this, right-click on the advertisement and choose properties, go to the schedule tab, change Program rerun behavior to “Always rerun program”.  Click Ok, then right-click on the advertisement and choose Re-run Advertisement.

Java8