Monthly Archives: November 2013

Create A Dedicated Account To Join Computers To A Domain

This is a quick post to describe the process of creating a dedicated account for joining machines to an Active Directory (AD) domain.  This is useful for things like System Center Configuration Manger task sequences and System Center Virtual Machine Manager templates.

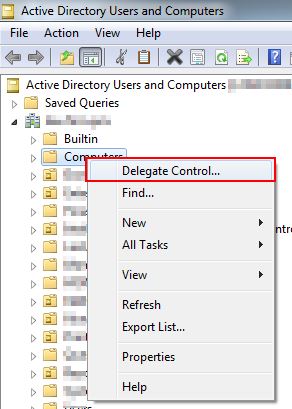
First create a standard Windows user account.  Next, right-click on the Computers Organisation Unit (OU) within your AD domain.  From the menu choose Delegate Control…

DJA1


On the next screen (Users or Groups) choose Add and select the user account you just created.  Click Next.  Choose “Create a custom task to delegate” on the next screen.

DJA2


Next, choose to only delegate control to computer objects and tick Create and Delete selected objects in this folder.  Click Next.

DJA3


On the next screen choose to show general permissions and from the list select:

  • Reset password
  • Read and write account restrictions
  • Validated write to DNS host name
  • Validated write to service principal name

DJA4

Click Next and finish to complete the wizard.  Repeat this process for any other OUs where you’ll be joining computers to the domain.

Adding Domain Users To The Local Administrators Group Using Group Policy

Adding AD users to the local administrators group on multiple computers is simple using Group Policy.  In this post I’ll describe the process.

Create a fresh group policy object (GPO) and link it to a test Organisation Unit (OU).  Add a test server to the OU.

Open the GPO and navigate to Computer Configuration -> Policies -> Windows Settings   -> Security Settings -> Restricted Groups.

RestrictedGroups1


Right click and choose Add Group.  If you want to add users to the local administrators group enter Administrators.  In the next window under “Members of this group:” click Add and choose the users to add to the local administrators group.  Note that any users that are currently in the local administrators group will be removed and replaced with the users you select here.  If that is what you want click OK and close the GPO.

RestrictedGroups2

The second method allows you to add an AD security group to the local administrators group.  This process is additive and users and groups that are currently in the local administrators group are untouched.

Navigate to Restricted Groups as previous, right click and choose Add Group.  This time enter the name of the AD security group you wish to add to the local administrators group.  Click Ok and on the next screen in the “This group is a member of:” section click Add.  Enter Administrators to add the group to the local administrators group. Click OK and close the GPO to save changes.  You can add additional users to the domain group and they will automatically be part of the local administrators group on servers that apply the GPO.

System Center Data Protection Manager 2012 R2 Operating System Support

As part of the planning stage for a System Center Data Protection Manager (SCDPM) 2012 R2 upgrade I found the support matrix for SCDPM 2012 R2.  The matrix shows that support for Windows Server 2003 and 2008 has been removed in the 2012 R2 release.

As I manage some SQL Servers that are running on Windows Server 2003 and 2008 I investigated the upgrade options.  Below is a short summary of the latest Windows OS version that is supported on various versions of SQL Server:

SQL Server 2005 supports up to Windows Server 2008 R2 as long as at least SQL 2005 SP3 is installed.

SQL Server 2008 supports Windows Server 2012 R2 as long as at least SQL 2008 SP3 is installed.

SQL Server 2008 R2 supports Windows Server 2012 R2 as long as at least SQL 2008 SP2 is installed.

SQL Server 2012 supports Windows Server 2012 R2 as long as at least SQL 2012 SP1 is installed.

Useful links:

Known issues installing SQL Server on Windows 7 or on Windows Server 2008 R2

Using SQL Server in Windows 8, Windows 8.1, Windows Server 2012 and Windows Server 2012 R2 environments

Restricting Access To Document Version History In SharePoint 2013

Using the Restricted Read permission in SharePoint 2013 it’s possible to prevent access to historical versions of documents, but it doesn’t work how I expected it to.

To enable the Restricted Read permission within a document library choose Library Settings from the ribbon.  Next click Permissions for this document library.  Tick the box next to the group for which you wish to enable Restricted Read and click Edit User Permissions from the ribbon.

RestrictVersions2

On the screen that loads untick Read and tick Restricted Read.  Click OK to close.

RestrictVersions3


This is where things don’t work as I expected.  I expected that when accessing the document library, the Version History option would be removed from the document properties menu, or the version history would only show the latest version.  However, when a user with Restricted Read attempts to open the document library from Site Contents they receive the error “Sorry, this site hasn’t been shared with you.”

RestrictVersions4

Restricted Read is described as providing view access to documents.  It turns out that this is possible, but only via a direct link to documents in the library e.g. a URL on a page or search.

SharePoint Language Pack Activation & Blob Cache Errors

Following the installation of SharePoint 2010 SP2 I noticed a large number of event log errors for the Publishing Cache on web front end servers.  The error was “An error occurred in the blob cache.  The exception message was “The system cannot fine the file specified. (Exception from HRESULT: 0x80070002)”.

BlobCache1

Looking deeper into the error using the ULSViewer I could see that the error was being caused by language pack files that could not be found.  The files could not be found because following the installation of the language pack the Publishing Infrastructure feature had not been reactivated.  The TechNet notes here state “After you install a new language pack, you must deactivate and then reactivate any language-specific features before you use the new language pack.”

In order to resolve the error I went into Site Settings -> Site collection features.  I deactivated the SharePoint Server Publishing Infrastructure, then activated the feature.  You need to do this out of hours and it does affect your SharePoint site while the feature is deactivated.

SharePoint 2013 Federated Search To Bing

In this post I’ll describe the process of federating SharePoint 2013 search queries to Bing.

Open Central Administration and navigate to the Search Service Application.  If necessary, configure a proxy server and tick the box to use the proxy settings for federated sources.

SharePointSearchFederation1

SharePointSearchFederation2

Next, click on Result Sources under Queries and Results.

SharePointSearchFederation3

Enter a name for the result source and choose OpenSearch as the protocol.

SharePointSearchFederation4

In the source URL box enter:

http://www.bing.com/search?q=?searchterms&format=rss&Market=en-GB

Leave the Credentials Information as Anonymous, click Save.

SharePointSearchFederation5

Edit the search page you want to use the display the Bing results.  Choose Edit Web Part for the Search Results web part.

SharePointSearchFederation6

Click on Change query.

SharePointSearchFederation7

Change the query source to the Results Source you created earlier and click Ok.

SharePointSearchFederation8

Click OK to save the web part properties and save/check-in/publish your page.

Run a search to see the Bing results.

SharePointSearchFederation9

RSS Viewer Web Part Stops Working After Installing SharePoint 2010 SP2

Following the installation of SharePoint 2010 SP2 (KB2687453) I found that the RSS viewer web part had stopped working; the web part continually showed the loading image.

2010SP2RSS1

After some research I discovered that the issue was introduced in SharePoint 2010 February 12, 2013 cumulative update (KB2767793).  Some suggested fixes are listed on the SharePoint forums.

The first option is to add a Content Editor Web Part to any page with the RSS viewer web part and paste the JavaScript below into the web part in HTML view.  Although this works it’s not a realistic work around if you have many pages with the RSS viewer web part.

<script type=”text/javascript”>
function CustomUpdateFormDigest()
{
if(window._spPageContextInfo != null)
{
var $v_2 = window._spPageContextInfo;
var $v_3 = $v_2.webServerRelativeUrl;
var $v_4 = window._spFormDigestRefreshInterval;
UpdateFormDigest($v_3, $v_4);
}
}
CustomUpdateFormDigest();
</script>

The second option is to add the above script to the SharePoint master page, but I couldn’t get this to work.

The third option is to turn off web page security validation for the web application from Central Administration -> Manage web applications.  Highlight the affected web application and select General Settings from the ribbon.

2010SP2RSS2


Turning off web page security validation worked, but I was then unable to create any new sites or lists because I received the error “An unhandled exception occured in the Silverlight application SharePoint 2010.

I have just finished testing the August 13, 2013 cumulative update for SharePoint 2010 (KB2817570) and it appears to fix the RSS viewer issue without any side affects.