Monthly Archives: September 2013

SharePoint 2013 Hide Left Hand Navigation Bar

Hiding the left hand navigation bar in SharePoint 2013 proved a little tricker than I expected.

RemLHNav1


My initial attempt to hide the navigation using CSS was to hide #sideNavBox.

RemLHNav2


However, I found this had the side effect of hiding the search refiners on /_layouts/15/osssearchresults.aspx.  I settled on hiding .ms-core-sideNavBox-removeLeftMargin as this doesn’t appear to have any side effects.

RemLHNav3

SharePoint 2013 Global Navigation Styling CSS

This is a quick post to show the CSS I used to style the global navigation / top navigation in SharePoint 2013.

I’ve used bright and different colours to make each CSS section easy to identify.  The top level is in blue, when you hover over a link it changes to aqua.  Hovering over a drop down item changes it to lime.

SP2103TopNavCSS1

SP2103TopNavCSS2 SP2103TopNavCSS3 SP2103TopNavCSS4


By default SharePoint wraps the menu item text, producing a result as below.

TopNavWrap1


In order to ensure all each menu item is displayed on one line I had to update ul.dynamic as below, using min-width, white-space: no wrap and word-wrap: normal.

TopNavWrap2


This is the result.

TopNavWrap3

Upgrading SharePoint 2010 To SharePoint 2013 Part 5

These are notes from my first upgrade of SharePoint 2010 to SharePoint 2013.  The purpose of the upgrade is to carry out an initial test upgrade to find any issues etc.  I’m not replicating the environment in terms of server roles etc. everything is installed on one server with local SQL.  I followed the steps outlined here: http://technet.microsoft.com/en-us/library/cc303436.aspx

This is part 5, part 1 can be found here, part 2 here, part 3 here and part 4 here.

Upgrade a site collection to SharePoint 2013

Reference: http://technet.microsoft.com/en-us/library/jj219650.aspx

Once the databases have been upgraded you can upgrade individual site collections.  You will see the notification bar at the top of the site with the option Start now or Remind me later.

Before beginning the site collection upgrade run health checks from Site Settings -> Site Collection Administration -> Site collection health checks.

On the run site collection health checks page, click Start checks.

After reviewing the health check results begin the site collection upgrade.  From the Site Settings page, click Site collection upgrade beneath Site Collection Administration.

On the following page, click Upgrade this Site Collection.

Once the upgrade has completed verify the upgrade from the Upgrade status page.  Go to Site Settings -> Site Collection Administration -> Site collection upgrade.  On this page click Review Site Collection Upgrade Status.

Finally, review everything is working and looks as you’d expect.

Additional configuration tweaks

Grant the default content access account the  “Retrieve People Data for Search Crawlers” permission for the User Profile Service application.

Configure the object cache user accounts http://technet.microsoft.com/en-us/library/ff758656.aspx

Enable the blob cache http://technet.microsoft.com/en-us/library/ee424404.aspx

Upgrading SharePoint 2010 To SharePoint 2013 Part 4

These are notes from my first upgrade of SharePoint 2010 to SharePoint 2013.  The purpose of the upgrade is to carry out an initial test upgrade to find any issues etc.  I’m not replicating the environment in terms of server roles etc. everything is installed on one server with local SQL.  I followed the steps outlined here: http://technet.microsoft.com/en-us/library/cc303436.aspx

This is part 4, part 1 can be found here, part 2 here, part 3 here and part 5 here.

Upgrade content databases to SharePoint 2013

Reference: http://technet.microsoft.com/en-us/library/cc263299.aspx

The SharePoint 2010 web application is configured to use Windows authentication, but Claims based authentication is required to enable the advanced functionality of SharePoint 2013.  Check the authentication provider that’s in use from Central Administration -> Manage web applications.  Click on the web application, then select Authentication Providers from the ribbon.

I used the process described here to convert a SharePoint 2010 classic mode web application to SharePoint 2013 claims based authentication.  You start by creating the web application using PowerShell, then once the SharePoint 2010 databases have been mounted using the command below, you use PowerShell to convert the web application to claims based authentication.

Use SQL Server Management Studio to restore the SharePoint 2010 content and My Site databases.

Reapply customisations web parts and web.config changes.

Use Mount-SPContentDatabase to attach the restored database into the web application you just created. Repeat the process for the My Sites database.

Verify the database upgrade status in Central Administration -> Upgrade and Migration -> check upgrade status.

View database upgrade log files in %COMMONPROGRAMFILES%\Microsoft Shared\web server extensions\15\LOGS

Next Steps

Verify sites as working correctly in SharePoint 2010 mode.

Configure search and perform a full crawl.

Backup the farm.

Upgrading SharePoint 2010 To SharePoint 2013 Part 2

These are notes from my first upgrade of SharePoint 2010 to SharePoint 2013.  The purpose of the upgrade is to carry out an initial test upgrade to find any issues etc.  I’m not replicating the environment in terms of server roles etc. everything is installed on one server with local SQL.  I followed the steps outlined here: http://technet.microsoft.com/en-us/library/cc303436.aspx

This is part 2, part 1 can be found here, part 2 here, part 3 here, part 4 here and part 5 here.

Copy databases to the new farm for upgrade to SharePoint 2013

Reference: http://technet.microsoft.com/en-us/library/jj839720.aspx

As this is a test upgrade, don’t set the databases to read-only.

Backup all the SharePoint 2010 content databases and the databases for any service applications you’re going to upgrade.  See part 1 for upgradeable service applications.

Copy the SharePoint 2010 database backups to the SharePoint 2013 SQL server.

Restore the SharePoint 2010 database backups on the SharePoint 2013 SQL server.

If upgrading SQL server versions, change the database compatibility level to match the new SQL server version.

Upgrading SharePoint 2010 To SharePoint 2013 Part 1

These are notes from my first upgrade of SharePoint 2010 to SharePoint 2013.  The purpose of the upgrade is to carry out an initial test upgrade to find any issues etc.  I’m not replicating the environment in terms of server roles etc. everything is installed on one server with local SQL.  I followed the steps outlined here: http://technet.microsoft.com/en-us/library/cc303436.aspx

This is part 1, part 2 can be found here, part 3 here, part 4 here and part 5 here.

Create the SharePoint 2013 farm

Reference: http://technet.microsoft.com/en-us/library/cc263026.aspx

Before taking SQL backups of the SharePoint 2010 databases:

  • Stop the Web Analytics service application.  Remove any Web Analytics web parts or features from the SharePoint 2010 site
  • PowerPoint Broadcast Sites cannot be upgraded

Record the passphrase of the Secure Store service application.

Export the encryption key for the User Profile service application.

Build test server: Windows Server 2012 and SQL Server 2012.

Install SharePoint 2013, don’t run the SharePoint Products configuration Wizard.

Install SharePoint 2013 language packs.

Install SharePoint 2013 updates as required.

Run the SharePoint Products configuration Wizard and create a new farm.

Run the Farm Configuration Wizard to configure the farm.  Don’t configure the Business Data Connectivity, Managed Metadata, PerformancePoint Services, Search, Secure Store, or the User Profile service applications if you’re using them in SharePoint 2010 as their content can be copied from SharePont 2010 and upgraded.  Don’t create a site collection, so click cancel at the end of the wizard on the site collection creation page.

Configure incoming and outgoing email settings, configure the Farm Administrators group and blocked file types as per SharePoint 2010.  Configure usage and health data collection, diagnostic logging and settings and schedules for timer jobs.

If the Workflow Auto Cleanup timer job is disabled in SharePoint 2010 you must disable it in SharePoint 2013 too.

Add the SharePoint Central Administration website to Trusted Sites and disable Internet Explorer Enhanced security.

Troubleshooting Hyper-V Integration Component Issues

Three old virtual servers were showing as VM Additions Not Detected in System Center Virtual Machine Manger 2012 SP1 (VMM).

Hyper-V_Int1

Choosing to Install Virtual Guest services didn’t resolve the problem as they were already listed in Add Remove Programs and installed.  Mouse integration was working without having to use CTRL-ALT-LEFT, but I was unable to use the Shut Down command from VMM.

Device Manager showed no errors, but the Event Log was showing errors for the failure of the following services to start: Hyper-V Heartbeat, Hyper-V Data Exchange, Hyper-V Guest Shutdown, Hyper-V Time Synchronization and Hyper-V Volume Shadow Copy Requestor.

A closer looked showed two Hyper-V integration components entries in Add Remove Programs: Hyper-V Integration Services (version 6.2.9200.16384) and Microsoft Hyper-V Guest Components.

Hyper-V_Int2I chose to uninstall both components.  Following a reboot I re-installed the Hyper-V Integration Services using VMM.  Following this everything worked correctly.

How To Specify Alternate File Location For Features On Demand In Server 2012

In Windows Server 2012 the binaries for Features on Demand e.g. the .Net Framework 3.5 are not installed as part of Windows.  When you enable this type of feature Windows will attempt to contact Windows Update to download the required files.  If you’re working on a server that’s not connected to the internet this can be problematic.  One work around is to use Group Policy to specify an ISO file as an alternate file source.

Mount the Windows Server ISO into the virtual machine

Open the local Group Policy editor by typing gpedit.msc at the Start Screen

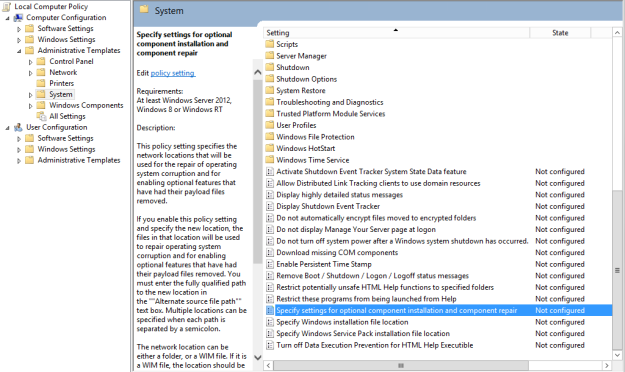
Navigate to Computer Configuration -> Administrative Templates -> System

Open the “Specify settings for optional component installation and component repair” setting

Enable the setting and type the path to the sxs folder on your ISO file.

GP1 GP2


View this KB for further information http://support.microsoft.com/kb/2734782/en-gb


Improving Virtual Server Deployment Time With Unattend.xml

As all the virtual machines I create using Hyper-V have the same hardware I decided to investigate the PersistAllDeviceInstalls option for unattend.xml.

The PersistAllDeviceInstalls setting configures whether the Plug and Play devices are uninstalled during the generalize phase and then reinstalled during the specialize pass of the sysprep process.  As all the virtual machines have the same hardware there’s no need to reinstall the Plug and Play devices and the result is a faster virtual machine deployment.

I created a fresh virtual server template with the PersistAllDeviceInstalls setting set to true and compared the setup time to the same template with PersistAllDeviceInstalls set to false.

With PersistAllDeviceInstalls set to false the setup time was 2:28.  With PersistAllDeviceInstalls set to true the setup time was 1:54, a small, but 23% saving in setup time.

If you want to add the PersistAllDeviceInstalls setting to unattend.xml here’s my example.

Unattend_xml