Category Archives: General

SQL Server log truncation fails with Veeam Backup & Replication

When using Veeam Backup & Replication 9.5 to backup SQL Server 2012 databases the transaction log was failing to be truncated for one database.  The database was using the full recovery model and the user account specified in Veeam’s Application Aware Processing had the required permissions and was successfully truncating the log of other databases on the same SQL instance.  The warning is displayed in Veeam as below.

SQLLog1

Veeam logs additional information in the VeeamGuestHelper log in C:\ProgramData\Veeam\Backup\VeeamGuestHelper_DATE.log.

SQLLog2

To resolve the error I added the following registry keys in the two locations below.  In my case the full registry path didn’t exist under Wow6432Node so I had to create it manually.

HKEY_LOCAL_MACHINE\SOFTWARE\Wow6432Node\VeeaM\Veeam Backup and Replication\

HKEY_LOCAL_MACHINE\SOFTWARE\VeeaM\Veeam Backup and Replication\

Name: SqlExecTimeout
Type: DWORD
Value: 600

Name: SqlLogBackupTimeout
Type: DWORD
Value: 3600

Name: SqlConnectionTimeout
Type: DWORD
Value: 300

If you’re encountering this error it my be due to a large number of SQL Server virtual log files (VLFs).  See these blog posts for more information on the issue and how to resolve it.

A Busy/Accidental DBA’s Guide to Managing VLFs

Transaction Log VLFs – too many or too few?

Windows cannot install required files error 0x80070570

I recently encountered an issue where a server wouldn’t install any Windows Updates, whether directly from Microsoft, or if downloaded from the Windows Update Catalog.  The error message received was “Windows cannot install required files error 0x80070570” and this is how I resolved the error.

From an administrative command prompt I ran the System File Checker using sfc /scannow.  This stopped with an error at 36%.  The log for sfc is in the %windir%\Logs\CBS folder.

Next, I used the Deployment Image Servicing and Management (DISM) tool to perform a health scan of the Windows system files.  Again, I ran this from an administrative command prompt, Dism /Online /Cleanup-Image /ScanHealth, but it showed no errors.

WUError-1

Despite the fact no corruption was detected, I ran the following command to fix corruption, Dism /Online /Cleanup-Image /RestoreHealth.  In my case, rather than using Windows Update to retrieve fresh files, I used the /Source switch to point to a copy of the SXS folder from a Windows installation ISO.

WUError-2

Having fixed the corruption Windows Updates now installed.

Windows 10 April 2018 Update (1803) fails to install with error 0x87D0070C

When deploying the Windows 10 April 2018 Update (1803) via SCCM the update fails to install with error 0x87D0070C.

1803-0

In Event Viewer you see the error “Installation Failure: Windows failed to install the following update with error 0x800704C7: Feature update to Windows 10 (business editions), version 1803, en-gb.”

The error is caused by the default maximum run time setting in SCCM of 60 mins, which in this case is insufficient for the update to install and it times out.  To increase the timeout value, find the update within the Software Updates section of SCCM, right-click on the update and select properties.

1803-1

Increase the value to something like 240 mins and click OK.

1803-2

Windows 10 April 2018 Update (1803) fails to install with error 0x80070241

When installing the Windows 10 April 2018 Update (1803) the installation fails with error 0x80070241.  When installing via SCCM you see the error “The software change returned error code 0x80070241(-2147024319).”

1802-0

In Event Viewer you see the error “Installation Failure: Windows failed to install the following update with error 0x80070241: Feature update to Windows 10 (business editions), version 1803, en-gb.”

To resolve the issue uninstall the Windows Assessment and Deployment Kit – Windows 10 (ADK).

Remotely disable Network Level Authentication (NLA)

If you try to RDP to a machine, but can’t because you receive the error below, you can use PSExec to remotely disable the requirement for NLA.

“The remote computer that you are trying to connect to requires Network Level Authentication (NLA), but your Windows domain controller cannot be contacted to perform NLA.  If you are an administrator on the remote computer, you can disable NLA by using the options on the Remote tab of the System Properties dialog box.”

Download PSExec from TechNet.  Run the code below updating the following values.

\\VMNAME – The name of the machine on which you want to disable NLA

VMNAME\ADMIN_ACCOUNT – The username of a local administrator on the machine on which you want to disable NLA, e.g. pc1\admin

psexec \\VMNAME -u VMNAME\ADMIN_ACCOUNT -p PASSWORD reg add “HKEY_LOCAL_MACHINE\SYSTEM\CurrentControlSet\Control\Terminal Server\WinStations\RDP-Tcp” /f /v SecurityLayer /t REG_DWORD /d 0


Installing Microsoft Office Through Office 365 Error Code 30125-4

Power Map, which is part of Microsoft’s Power BI, requires an Office 365 version of Excel.  When attempting to install Excel via Office 365 on a server I ran into the error:

Error Code 30125-4 when installing Office 365 Something went wrong. Sorry, we ran into a problem

Although the proxy was configured in Control Panel -> Internet Options, I had to enable the proxy via an elevated command prompt.  Type: netsh winhttp set proxy %Address of proxy server% bypass-list=(local)

This will configure the proxy server and setup proxy bypass for local addresses.

Create A Dedicated Account To Join Computers To A Domain

This is a quick post to describe the process of creating a dedicated account for joining machines to an Active Directory (AD) domain.  This is useful for things like System Center Configuration Manger task sequences and System Center Virtual Machine Manager templates.

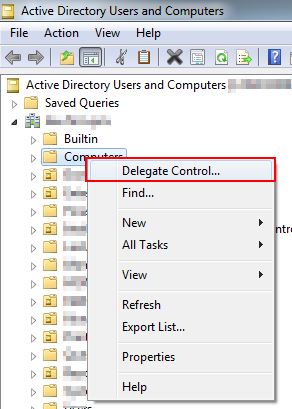
First create a standard Windows user account.  Next, right-click on the Computers Organisation Unit (OU) within your AD domain.  From the menu choose Delegate Control…

DJA1


On the next screen (Users or Groups) choose Add and select the user account you just created.  Click Next.  Choose “Create a custom task to delegate” on the next screen.

DJA2


Next, choose to only delegate control to computer objects and tick Create and Delete selected objects in this folder.  Click Next.

DJA3


On the next screen choose to show general permissions and from the list select:

  • Reset password
  • Read and write account restrictions
  • Validated write to DNS host name
  • Validated write to service principal name

DJA4

Click Next and finish to complete the wizard.  Repeat this process for any other OUs where you’ll be joining computers to the domain.

Adding Domain Users To The Local Administrators Group Using Group Policy

Adding AD users to the local administrators group on multiple computers is simple using Group Policy.  In this post I’ll describe the process.

Create a fresh group policy object (GPO) and link it to a test Organisation Unit (OU).  Add a test server to the OU.

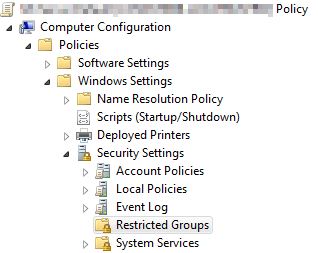
Open the GPO and navigate to Computer Configuration -> Policies -> Windows Settings   -> Security Settings -> Restricted Groups.

RestrictedGroups1


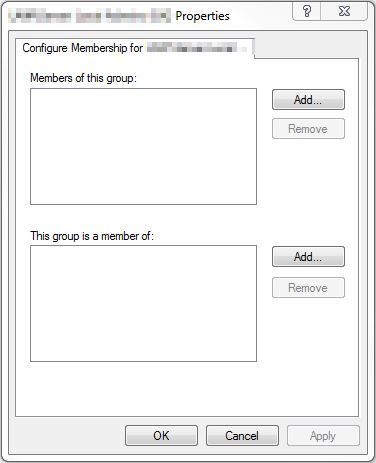
Right click and choose Add Group.  If you want to add users to the local administrators group enter Administrators.  In the next window under “Members of this group:” click Add and choose the users to add to the local administrators group.  Note that any users that are currently in the local administrators group will be removed and replaced with the users you select here.  If that is what you want click OK and close the GPO.

RestrictedGroups2

The second method allows you to add an AD security group to the local administrators group.  This process is additive and users and groups that are currently in the local administrators group are untouched.

Navigate to Restricted Groups as previous, right click and choose Add Group.  This time enter the name of the AD security group you wish to add to the local administrators group.  Click Ok and on the next screen in the “This group is a member of:” section click Add.  Enter Administrators to add the group to the local administrators group. Click OK and close the GPO to save changes.  You can add additional users to the domain group and they will automatically be part of the local administrators group on servers that apply the GPO.

Troubleshooting Hyper-V Integration Component Issues

Three old virtual servers were showing as VM Additions Not Detected in System Center Virtual Machine Manger 2012 SP1 (VMM).

Hyper-V_Int1

Choosing to Install Virtual Guest services didn’t resolve the problem as they were already listed in Add Remove Programs and installed.  Mouse integration was working without having to use CTRL-ALT-LEFT, but I was unable to use the Shut Down command from VMM.

Device Manager showed no errors, but the Event Log was showing errors for the failure of the following services to start: Hyper-V Heartbeat, Hyper-V Data Exchange, Hyper-V Guest Shutdown, Hyper-V Time Synchronization and Hyper-V Volume Shadow Copy Requestor.

A closer looked showed two Hyper-V integration components entries in Add Remove Programs: Hyper-V Integration Services (version 6.2.9200.16384) and Microsoft Hyper-V Guest Components.

Hyper-V_Int2I chose to uninstall both components.  Following a reboot I re-installed the Hyper-V Integration Services using VMM.  Following this everything worked correctly.

How To Specify Alternate File Location For Features On Demand In Server 2012

In Windows Server 2012 the binaries for Features on Demand e.g. the .Net Framework 3.5 are not installed as part of Windows.  When you enable this type of feature Windows will attempt to contact Windows Update to download the required files.  If you’re working on a server that’s not connected to the internet this can be problematic.  One work around is to use Group Policy to specify an ISO file as an alternate file source.

Mount the Windows Server ISO into the virtual machine

Open the local Group Policy editor by typing gpedit.msc at the Start Screen

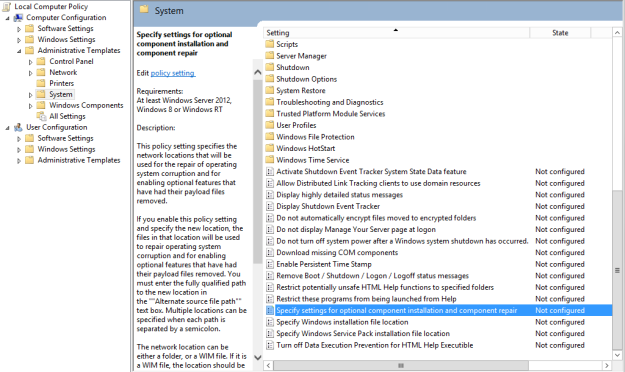
Navigate to Computer Configuration -> Administrative Templates -> System

Open the “Specify settings for optional component installation and component repair” setting

Enable the setting and type the path to the sxs folder on your ISO file.

GP1 GP2


View this KB for further information http://support.microsoft.com/kb/2734782/en-gb