Category Archives: SharePoint

SharePoint Service Pack 1 – Installation of this package failed

When installing SharePoint 2013 service pack 1 on a SharePoint farm, the extraction of the service pack kept failing on one web front end.

When clicking on the officeserversp2013-kb2880552-fullfile-x64-en-us.exe file, the User Account Control dialog appeared, then when I continued to extract the files, the process failed with “The installation of this package failed”.

SP1-Error-1

Looking the service pack log file showed that some files were successfully extracted before the error.

SP1-Error-2

In order to work around the error on this server I found I needed to open an administrative command prompt and then run the service pack.


SharePoint 2013 – Sorry, something went wrong

Following some work on SharePoint, users were encountering the error “Sorry, something went wrong.  The context has expired and can no longer be used. (Exception from HRESULT: 0x80090317)”

SP-Content-Expired-0

Searching the web uncovered suggestions to change the claims token timeout value, reducing it from its default value of 24 hours, to something much lower, like 1 hour.  You can check the current value, shown in minutes, using the command below.

stsadm.exe -o getproperty -propertyname token-timeout

In my case the value had already been reduced to 1 hour, so I decided to set it back to the default of 24 hours using the command below.  This resolved the error.

stsadm.exe -o setproperty -propertyname token-timeout -propertyvalue 1440

SharePoint 2013 Save Document Library As Template Missing

If you view a document library settings page and “Save document library is a template” is missing try this work around.

Take the document library settings page URL, e.g. http://SharePoint/_layouts/15/listedit.aspx?List=58d3d056… and change listedit.aspx to savetmpl.aspx.  Press enter to load the page and you should be prompted to save the document library as a template.


Missing Search Results In SharePoint 2013 When Using A Content Enrichment Web Service

Users reported that they couldn’t find a few specific documents when searching within SharePoint 2013.  Checking the crawl log showed documents with the error “The item failed due to an error occurring when sending or receiving data to the external content processing enrichment web service.”  I searched the ULS for one of the effected documents and found the error “System.Net.WebException: The remote server returned an error: (413) Request Entity Too Large.”  Checking the web.config for the content enrichment web service showed the maxReceivedMessageSize value was configured to 8 MB.

TWCEWS0


To resolve the error I increased the value of the maxReceivedMessageSize property and re-indexed the document library.

The interesting thing about this case is that the content enrichment web service is designed to add additional metadata to documents.  When the content enrichment web service failed to receive documents over 8 MB the documents didn’t appear within search at all, it wasn’t just the case that they appeared but without the extra metadata.

Configure SharePoint 2013 Search Index Managed Property Sizes

If you check the crawl logs for SharePoint 2013 you may see warnings similar to those below:

The item has been truncated in the index because it exceeds the maximum size.

This item was partially parsed. The item has been truncated in the index because it exceeds the maximum size.

This item was truncated because the parsed output was greater than the maximum number of allowed characters.

Microsoft have detailed the SharePoint 2013 Search boundaries and limits here and I’ll show how these boundaries and limits relate to the warnings above.

The item has been truncated in the index because it exceeds the maximum size.

This message relates to the indexed managed property size and according to the aforementioned documentation “This is the default maximum size of a managed property that is set to either “searchable” or “queryable”.”  The property limit can be configured between 0 and 2048KB.

In order to change the limit open an elevated SharePoint 2013 Management Shell.  To get the current property value run the code below.

$p = Get-SPEnterpriseSearchMetadataManagedProperty -Identity body -SearchApplication (Get-SPEnterpriseSearchServiceApplication)
$p.MaxCharactersInPropertyStoreIndex

SMP0


To change the property value run the code below, substituting the value for your own requirements.

$prop1 = Get-SPEnterpriseSearchMetadataManagedProperty -Identity body -SearchApplication (Get-SPEnterpriseSearchServiceApplication)
$prop1.MaxCharactersInPropertyStoreIndex = “2048000”
$prop1.Update()

SMP1


This item was partially parsed. The item has been truncated in the index because it exceeds the maximum size.

This message  relates to the retrievable managed property size and according to the aforementioned documentation “This is the default maximum size of a retrievable managed property.”  The property limit can be configured between 0 and 2048KB.

In order to change the limit open an elevated SharePoint 2013 Management Shell.  To get the current property value run the code below.

$p = Get-SPEnterpriseSearchMetadataManagedProperty -Identity body -SearchApplication (Get-SPEnterpriseSearchServiceApplication)
$p.MaxCharactersInPropertyStoreForRetrieval

SMP2


To change the property value run the code below, substituting the value for your own requirements.

$prop2 = Get-SPEnterpriseSearchMetadataManagedProperty -Identity body -SearchApplication (Get-SPEnterpriseSearchServiceApplication)
$prop2.MaxCharactersInPropertyStoreForRetrieval = “2048000”
$prop2.Update()

SMP3


This item was truncated because the parsed output was greater than the maximum number of allowed characters.

This message relates to the parsed content size of the document.  This has a boundary limit of 2 million characters that can’t be increased.  Search stops parsing a document once the limit of 2 million characters has been reached and any content past this point isn’t included in the index.

Once you’ve configured the indexed managed property and retrievable managed property sizes you need to run a full crawl.

Search By Document ID In SharePoint 2013

The SharePoint Document ID Service is a Site Collection Feature which assigns unique IDs to documents within a Site Collection.  The unique document ID can be used to locate documents within a Site Collection irrespective of their location.  This is useful when documents may be moved around within a Site Collection due to work flows, or other processes.

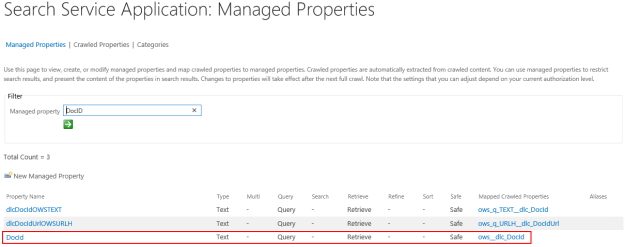
To search by document ID, open the Service Service Application through Central Administration, then open the search schema, which is under Queries and Results.  Search for DocID in the managed properties box.

DocID0


The search results should return a managed property with the name DocID and the Query property should be enabled.  The property should be mapped to the crawled property ows_dlc_DocId.

The Query property enables the ability to search specifically by the property.  Open your search center and in the search box enter DocID:%DOCID% where you replace %DOCID% with the document ID for which you wish to search.

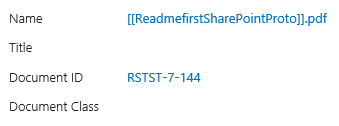
Here I have a document with the ID RSTST-7-144

DocID1

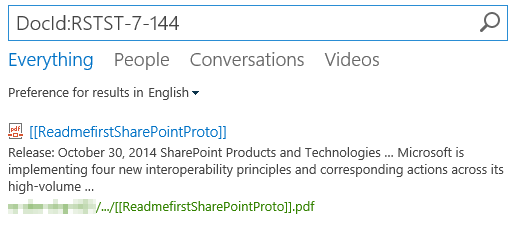
I have found the document using the search term DocId:RSTST-7-144

DocID2


Changing The Default Number Of Refiner Options In SharePoint 2013 Search

By default, SharePoint 2013 Search shows 5 options for each refiner, except result type, which has 6 options.

RefinerCount0

In order to change the number of options you need to edit the Filter_Default.html display template.  Do to this open Site settings, then Master pages and page layouts.  Drill through to  Display Templates -> Filters.  Download a copy of Filter_Default.html.

RefinerCount1Open Filter_Default.html in a text editor and find the two values below.

RefinerCount2

Change the values for shortListSize as required and save the file.  Upload the file to the document library where you downloaded the copy and overwrite the existing file.  Refresh the search page to see the change.

RefinerCount3


SharePoint 2013 Content Search Web Part: One or more of the following resource files failed to load

When adding the Content Search Web Part to a site for the first time, the web part took a while to load, then displayed the error:

One or more of the following resource files failed to load: /_catalogs/masterpage/display templates/language files/en-GB/customstrings.js?ctag=322$$15.0.4569.1000

CSWP0

To look for the missing file I went to Site Settings, then Master page and page layouts, which is under the heading Web Designer Galleries.  On that page I navigated through Display Templates -> Language Files.  I could see that for some reason the en-GB folder was missing.

CSWP1

The fact that the folder was missing was odd because I’d used the Content Search Web Part before within the Site Collection.  Anyway, to resolve the error I created the en-gb folder and copied customstrings.js from the en-us folder and pasted it into en-gb.

CSWP2

Switching Language In SharePoint 2013

In SharePoint 2010 it was easy to switch between languages using the user menu within SharePoint.  To switch language In SharePoint 2013 open Control Panel -> Language and click Add a language.

Language

Once you’ve added the required languages switch between them by moving the language you want to use to the top of the list.

Language2

Close and re-open your browser for the change to be recognised.

Language3

Re-Size The Distributed Cache Service In SharePoint 2013

When you install SharePoint Server 2013 the Distributed Cache service is configured to use 10% of the RAM on the server.  Half of the 10% is used for caching and the other half is used for memory management.  If you add RAM to the server you need to manually re-configure the Distributed Cache service to make use of the extra RAM.

To check the current RAM allocation run the command below from an elevated SharePoint 2013 Management Shell, replacing the server name as necessary.

Use-CacheCluster
Get-AFCacheHostConfiguration -ComputerName ServerName -CachePort “22233”

Distributed Cache Service 1

Calculate the new Distributed Cache service cache size for a 24 GB SharePoint Server as follows:

10% of 24 GB = 2.4 GB

Divide 2.4 GB by 2 = 1.2 GB

Convert 1.2 GB to MB = 1229 MB

Stop the Distributed Cache service on each host using Central Administration -> System Settings -> Manage services on server.

Run the command below from an elevated SharePoint 2013 Management Shell on one host at a time, replacing the cache size as necessary.

Update-SPDistributedCacheSize -CacheSizeInMB CacheSize

Start the Distributed Cache service on each host using Central Administration -> System Settings -> Manage services on server.