Clicking View Properties on a SharePoint list item loads a display form which shows all the list columns and their values. I needed to remove one of the list columns from a display form and in this post I’ll show you how I did it. I’m going to remove the specific image column in the screenshot below.

In SharePoint Designer open the list you want to customise. In the Forms section click New.

Provide a file name and select the form type you want to create. Here I’m creating a display item form. I’ve chosen to set the new form as the default display form as I want to override the default form.

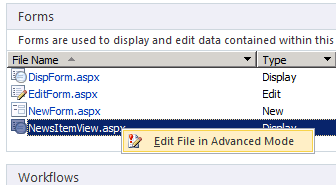
In the Forms section right-click on the form and select Edit File in Advanced Mode.
Switch to code view and select the HTML for the row you want to remove. Each row is displayed withing <tr></tr> table row tags. In the screenshot below I’ve selected the row which displays the jurisdiction column. Once you’ve selected the correct row click delete.

Save your changes. When you click on the list item and select view properties you’ll see that the row has been removed.

If your list contains attachments please be aware of the following bug whereby attachments aren’t displayed in the custom display form. See the KB article for more information and a workaround.
“SharePoint Designer created display forms do not display attachments when present.”

Pingback: Customising A SharePoint Display Form To Remove A Field | Viswanathan Lakshmanan