Tag Archives: SQL Server

A significant part of sql server process memory has been paged out.

Looking through the SQL Server log shortly after the server started I saw:

A significant part of sql server process memory has been paged out. This may result in a performance degradation. Duration: 0 seconds. Working set (KB): 128084, committed (KB): 423936, memory utilization: 30%.

This is on a Windows Server 2012 R2 VM with SQL Server 2008 R2, 8GB RAM and a maximum server memory configuration of 6144MB.  Lock pages in memory is enabled for the SQL Server service account.  There are many reports of this error from the Windows Server 2003 x64 and SQL Server 2005 era, but little information from more recent times. 

The message is saying that a large amount of the memory allocated to the SQL Server process, sqlservr.exe, has been moved from RAM to the page file as the process’ working set has been trimmed.  In the case of  the message above the SQL Server process has a working set of 128084KB of memory allocated in RAM and a total memory allocation which could be in RAM or on disk of 423936KB.  The memory utilisation value of 30% is showing that ~30% of the SQL Server process’ total memory allocation is in RAM, which is the working set value.  This warning message is raised when the memory allocation in RAM (working set) is 50% or below the committed memory value.

In the case of this server the working set and committed values are low compared to the maximum server memory setting and Task Manager was showing ~2.5GB of the server’s 8GB RAM in use.  Following research I found this MSDN blog article which discusses working set trim warning messages early in the SQL Server startup phase, or shortly after the server is ready for user connections.  Based on this article it appears that in my case I can ignore the warning as the message values are low compared to the server max memory setting and there is little activity on the server.


SSIS Package Incompatible in SSDT and Visual Studio 2017

Having installed Visual Studio 2017 Professional with the SQL Data Tools component I tried to open a SSIS package.  This failed to load and was listed as incompatible and that the application wasn’t installed.

I ran the SQL Server Data Tools (SSDT) install and added the SQL Server Integration Services component to my existing Visual Studio installation.  Unfortunately, it was still showing as incompatible and that the application wasn’t installed.

The resolution was to right click on the project and click reload.  This reloaded the project files from disk and I was able to edit the package.

Extend SharePoint 2013 People Search Using Business Connectivity Services – Multi-Value User Properties

Following on from the four part series Extend SharePoint 2013 People Search Using Business Connectivity Services I had a requirement to update multi-value user properties using BCS.  If you haven’t read the posts in the series I highly recommend that you do as I’m only going to cover the changes I had to make in order to import multi-value properties.

For this example I’ve added a column to my SQL Server table called Speciality and updated the stored procedure to return the values in this column.

BCS-Multi1

In the screen shot above I’ve added three specialties for myself, SharePoint, Hyper-V and SQL Server.  This has created multiple rows, an additional row for each specialty  each with the same email address.  The email address is important as this will be used by a filter within the external content type to return multiple values for each user.

Next, in SharePoint Designer open the external content type that references the stored procedure and click on Operations Design View in the ribbon.

BCS-Multi2

In Data Source Explorer find the stored procedure under Routines, right click on it and choose New Read List Operation.

BCS-Multi3

Click Next and on the Input Parameters screen click to add a Filter.  Create the filter, in my case on the email field and click Ok.  

BCS-Multi4

On the Return Parameter screen click on Email, then tick Map to Identifier.  Finish the wizard and save changes to your external content type.

BCS-Multi5

From Central Administration open your User Profile Synchronization Service and click on Configure Synchronization Connections.

BCS-Multi6

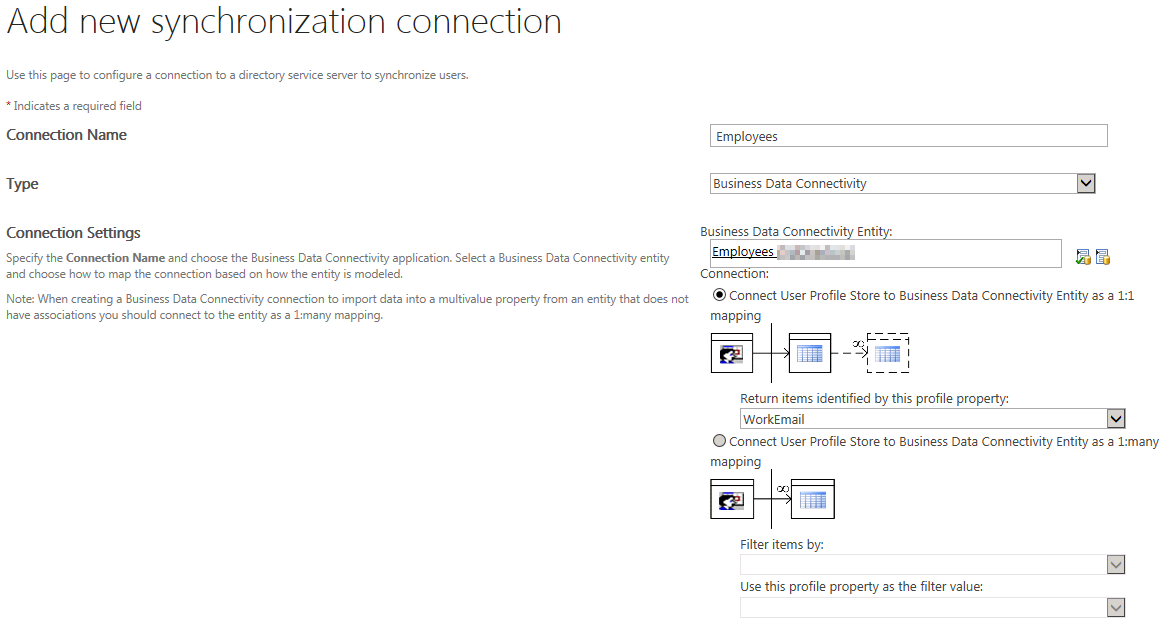
Use the drop down to edit your external content type connection.  You can now choose a 1:many mapping, filter using the email filter against the WorkEmail user profile property.

BCS-Multi7

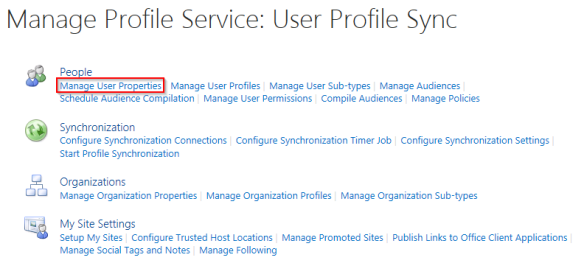
To create a multi-value user open the User Profile Synchronization Service and click on Mange User Properties.

BCS-Multi8

Click on New Property, select the property type as string (Multi Value) and choose the multi value separator you’d like to use.

BCS-Multi9

Map the new property to the correct attribute from your BCS data connection and click Ok.

BCS-Multi10

Run a full profile synchronization, then click on Manage User Profiles to search for a user and check the properties have been populated.

BCS-Multi11

BCS-Multi12

Extend SharePoint 2013 People Search Using Business Connectivity Services Part 4

In this four part series I will describe the process of extending the SharePoint 2013 user profile from Active Directory with additional data from a SQL Server table.  The additional data will then be displayed in users’ My Sites and SharePoint people search.

Part 1 will show the process to create the SQL Server table.  Part 2 will show the process to make the data in the SQL Server table accessible to SharePoint.  Part 3 will show the process to extend user profiles and My Sites to include the additional user data.  Part 4 will show the process to make the new user profile properties accessible in SharePoint Search.

The SharePoint environment is SharePoint 2013 Standard, with SQL Server 2008 R2 and SharePoint Designer 2013.  The steps are based on an environment where the User Profile Service has already been setup, users have been imported from Active Directory and My Sites have been configured.  It is assumed that SharePoint Search has been configured and a search site using the Enterprise Search Center template has been created.

In this post I’ll describe the process of making the custom user profile properties you populated in the last post visible within SharePoint Search.

Open Central Administration -> Application Management -> Manage service applications and open your Search Service Application.  Click on Content Sources, then click on the drop down for your user profile content source and run start an incremental crawl.

BCS - Search1

Once the crawl has completed click on Search Schema under Queries and Results.

BCS - Search2

Click on Crawled Properties, then in the managed property box search for one of your custom user profile properties.

BCS - Search3

Your custom property should be listed as People:XXXX as the property was added as a user property.  Click on the custom property and check the Include in full-text index box is ticked.

BCS - Search4

Return to the Managed Properties screen and click on New Managed Property.

BCS - Search7

Enter a property name, e.g. Jurisdiction and select the correct data type.

BCS - Search8

There are many options to experiment in this screen, but as a minimum for this example tick Queryable (this appears to be a requirement for the refiner option), Retrievable, which allows us to display the property in search results and set Refinable to Yes – active as I want to be able to refine search results using this custom property.  Finally, map this new managed property to the custom user profile property and click Ok.

BCS - Search9 BCS - Search10

Repeat these steps for all the other custom properties you wish to use in search.  Once you’ve created all your managed properties run a full crawl of your content source.

BCS - Search12

Once the full crawl has completed we need to add the custom properties to the list of refiners and search result.  Navigate to your search site and search for a user that will have the custom properties populated.

BCS - Search5

Edit the search results page, and click on Edit Web Part for the Refinement web part.

BCS - Search6

In the Properties for Search Refinement screen click on Choose Refiners.

BCS - Search11

From the screen that loads, select the custom property you wish to add as a refiner and click Add, then click Ok.

BCS - Search13

Click OK on the Properties for Search Refinement web part.  You should now see your new refiner.

BCS - Search14

If you’re happy check in and publish the page.

BCS - Search15

Now we I’m going to show you the process to display a custom property under the user’s details.  Edit the Search page and click on the display template link.

BCS-SDT1

On the display template page choose to download a copy of the existing People Item template.

BCS-SDT2

Create a copy of the downloaded template and open it in a text editor like Notepad++.  Update the title field to indicate this is your custom display template.

BCS-SDT2.5

Add your custom user property name to the ManagedPropertyMapping section.

BCS-SDT3

Create a variable for your custom property.

BCS-SDT4

I’ve copied the department section and replaced the variable etc. with jurisdiction.  I’ve also added Jurisdiction:  in the value DIV as this will add a prefix to the value on the search result screen.

BCS-SDT5

Open SharePoint Designer, connect to your SharePoint site and navigate to Page Layouts -> Display Templates -> Search.  Click on Import Files in the ribbon and upload your custom display template.

BCS-SDT6

Navigate to the display template gallery and publish a major version of your template.

BCS-SDT7

Using the link on the search results page, open the Manage Result Types page.  Use the drop down for the Person result type to create a copy.

BCS-SDT8

Enter a name for the new result type and select your custom display template.

BCS-SDT9

In my environment the updated display template worked straight way.  However, if you need to change the display template, on the people search results page edit the web part properties on the People Search Core Results.

BCS-SDT10

Select your custom display template and save changes.

BCS-SDT11

You should now see the custom property in the search results.

BCS-SDT12

Troubleshooting

If you have problems getting this to work the following tools may help:

Monitor connections to the SQL Server during the user import task using SQL Server Profiler.  This will enable you to see if SharePoint is connecting to the SQL Server and the commands that are being run.

Monitor the user import process using Synchronization Manager Service, which can be found at “C:\Program Files\Microsoft Office Servers\15.0\Synchronization Service\UIShell\miisclient.exe”.

Monitor SharePoint logs using the ULSViewer.  You can create a filter to include results only from Business Data Connectivity Services. http://archive.msdn.microsoft.com/ULSViewer

Extend SharePoint 2013 People Search Using Business Connectivity Services Part 3

In this four part series I will describe the process of extending the SharePoint 2013 user profile from Active Directory with additional data from a SQL Server table.  The additional data will then be displayed in users’ My Sites and SharePoint people search.

Part 1 will show the process to create the SQL Server table.  Part 2 will show the process to make the data in the SQL Server table accessible to SharePoint.  Part 3 will show the process to extend user profiles and My Sites to include the additional user data.  Part 4 will show the process to make the new user profile properties accessible in SharePoint Search.

The SharePoint environment is SharePoint 2013 Standard, with SQL Server 2008 R2 and SharePoint Designer 2013.  The steps are based on an environment where the User Profile Service has already been setup, users have been imported from Active Directory and My Sites have been configured.  It is assumed that SharePoint Search has been configured and a search site using the Enterprise Search Center template has been created.

In this post I’ll describe the process of extending the Active Directory user profiles with information from SQL Server and how to display this data in SharePoint people search and My Sites.

Open Central Administration -> Application Management -> Manage service applications and open your User Profile Service application.  Click on Configure Synchronization Connections.

BCS - AD1

On the Synchronization Connections page click on Create New Connection.  Enter a name for the connection, change the connection type to Business Data Connectivity.  In the Business Data Connectivity Entity section, select your External Content Type.  Choose to connect using a 1:1 mapping and return items based on the WorkEmail property.  Click Ok.

BCS - AD2

We now need to map the fields returned by the connection to SQL Server to fields in user profiles.  Return to your User Profile Service application in Central Administration and click on Manage User Properties.

BCS - AD3

On the Manage User Properties screen click on New Property.  I’m going to show the process to create a property called jurisdiction, which will be mapped to the jurisdiction field in SQL Server.  The process needs to be repeated for all fields you wish to add to the user profile.

Enter a name, display name and change the data type and field length to match the field you’re mapping.

BCS - AD4

Change the Policy Setting to optional, and the Default Privacy Setting to Everyone.  This allows the field to be displayed in the profile properties section of the user’s profile.  I don’t want users to be able to change the jurisdiction value, so update the Edit Settings as appropriate.  In order to display the value on the user’s profile page tick the box under Display Settings.  Ensure the Indexed box is ticked to make the property searchable.

BCS - AD5

You now need to map the user profile property to the field in the External Content Type.  Choose the Employees data source and the appropriate field to map to the user property.  Leave the direction as import and click Add, followed by Ok to save the new property.

BCS - AD6

Repeat this process for any other properties you wish to map to user profile properties.  Once you’ve mapped all the user properties run a full user profile synchronization process from Start Profile Synchronization.

BCS - AD7

Once the profile synchronization has finished, click on Manage User Profiles, then search for a user that should have been populated with data.

BCS - AD8

If you scroll through the user profile you should see your custom user profile properties have been populated.

BCS - AD9

Visit a user’s My Site and click on SHOW MORE under the user’s details to see your custom user profile properties.

BCS - AD10

In the final part of this series I’ll show you how to make the custom properties visible within SharePoint Search.